Stay with me while I review the latest
creation and much awaited new fragrance
from Mugler which is the Alien Man.
Welcome to Ellie Smells, and today I'm joined
by a very special guest, and this is
Timbo who you've heard me talk about a
lot of times on our videos on our
Channel! And today we are going to be
reviewing the Alien Man, the latest
creation from Thierry Mugler. And this
one was launched literally a couple of
weeks ago. So May 2018, and it's the
male counterpart to the lady's Alien
which was launched in 2005. So we're
going to spray it anyway so that Tim can
try it on his skin and just see how it
settles and see what he feels to it.
Hello Tim, say hello? [Tim] Hello Tim![Ellie] and then you can spray
that on you! So just a little bit about
Thierry Mugler himself. He was born in
France, he's a French a fashion designer
and also a directo,r and he's really well
known for creating the black dress worn
by Demi Moore in Indecent Proposal, bet
you didn't know that Tim? [Tim] I don't watch those kind of films!
[Ellie] so anyway this fragrance was created by Jean Christophe
Haerault, who's made fragrances for
Balenciaga and also Chopard and Mugler
to name a few. So we've heard quite a lot
about the Alien man and this one is
classed as a woody leather aromatic or
even an oriental woody. But it's supposed
to be created in three 'vibrations' and
the top notes are the electric vibration.
So in there, are you picking anything out
in particular? I think initially it
smells quite sweet! [Tim] It's sweet, I'm
getting a lot of powder! [Ellie] Yeah well it's
in the top notes you've got beechwood,
you've also got dill, and you've got star
anis. Now star anis is where you get that
licoricey sweet. But definitely you
can pick the dill out and it's quite
herbal, you can definitely pick up the
aromatic essences. So that's like the
electric part, the electric vibration. And
then there's a sensual heart vibration!
And that's because in there you've got
leather.Are you picking the leather out
because you love leather don't you? [Tim] I can
smell the leather in it! [Ellie] and it's also
got cashmere and wood, which is also in
the ladies Alien the Parum, and it also
has osmanthus which is like a floraly
note. So although it's a masculine
fragrance, you do get some florals in
there. What's it smelling like on your
skin? Yeah, you see that I can definitely
get that right
leatheryness on there, that might just be
skin Tim- haha! [Tim] Anyway, as you know I do
like leather fragrances! It does remind
me a little bit of the Bentley Intense
and I really like Bentley Intense, but this is, it's similar
but it's sweet! [Ellie] And when you first tried
it the other night you liked it, didn't
like it, and then loved it, once it
settled didn't you. [Tim] It took a while to
settle, the first burst I really liked it!
Ever so fresh! It's not what you're
expecting at all, not from a Mugler
fragrance anyway! It's quite mature isn't
it? It's like, grown up? [Ellie] That first burst is electric 'bzzz'
I would say you've got the sensual nurse
But then you've got magnetic in the base
which is white amber. So - all together
it definitely is more woodsy and
aromatic. I would say! [Tim] It is.
[Ellie] and now that this is dried down it's really
quite clean and fresh. So when do you
reckon you would wear this then? [Tim] To be
honest though, I think this would be
something that you'd wear every day.
I was reading a lot of the
reviews of it and a lot of people were
saying they were disappointed or the
expecting more.
But I think they've sort of put
in a curveball here, brought in something
that's quite grown up! I'd wear this for
work! [Ellie] I think people associate
Mugler with sort of like really 'out
there' sort of fragrances. so I think that
they thought that this was going to be
something really obscure? Whereas I think
this is a really wearable fragrance and
I think, like you, that it could be
something that you could pop on during
the day, wear it in the evening, it's
definitely got that-that I think... it's
not overpowering but it is sort of like
quite a powerful and a seductive fragrance.
[Tim] At first I thought it wouldn't be that
long-lasting either, but after I've worn
it,the following morning I could still
smell it, and it was quite nice!
[Ellie] I think it's definitely a fragrance that
grows on you the more you smell it!
It's quite addictive the more you want
to smell it.
so you'd be quite happy to wear that then?
[Tim] I'd be very happy to wear that! I think
one of the things that makes it
addictive is, as I said there's that real
animalistic... and you just can't help but...
[Ellie] That might be something like part of the
leather, I mean you like that anyway
don't you? [Tim] I do [Ellie] so I would say that
anybody that may be likes those leathery
fragrances such as the Fahrenheit, some
of the Armani fragrances, the Bentley or
even the Valentino Uomo, this would be a
really good fragrance to to try. We also
thought that this had sort of
essences of the Zadig and Voltaire which
we've actually done a review about
earlier if you want to take a look at
that? But yeah, I'm loving this one! I
think this one's going to do really well
and I think it's quite surprising
because it is quite different![Tim] It is and
not in the way that everybody's
expecting![Ellie] Yeah, pleasantly different!
[Tim] It is, very much so! [Ellie] And at the moment, if
you want to show them what they're going
to get, gift with purchase? So there is a
lovely gift with purchase which is this
wash bag, and just open the wash bag,
and in there a little surprise which ones that Tim?
[Tim] can I put my glasses on? [Ellie] I shouldn't do this to him!
[Tim] It's an Alien Man Mugler hair and body
shampoo. [Ellie] So the lovely thing about that
is that you're able to layer it which is
going to make the fragrance last on the
skin longer, but the fact that you can
just put it all over
[Tim] Excellent, I like layering! [Ellie] So that's going to
be really good. So go along, try this out
pick up a sample, and this is going to be
really fantastic because we've got
Father's Day coming up next month in
June so this might be a really good buy.
So go and check this out, let me know
what you think to it? Whether you agree
with Tim who likes a leathery fragrance?
This is Tim's first time on camera
with me. Did you enjoy it Tim? Anyway, don't
forget to Like and subscribe to our
Channel and also to leave your comments
and we'll see you again soon on Ellie Smells
Say bye Tim! [Tim] Bye Tim! [Ellie] Bye!
[Music]
For more infomation >> Alien Man by Mugler Fragrance Review - Duration: 7:55.-------------------------------------------
Lamborghini Urus 2019 | 2019 Lamborghini Urus SUV Price And Review - Duration: 3:04.
Lamborghini Urus 2019
Lamborghini Urus 2019 | 2019 Lamborghini Urus SUV Price And Review
2019 Lamborghini Urus SUV Price And Review
-------------------------------------------
Attorneys petition US Supreme Court to review Hampton man's death by police - Duration: 1:03.
-------------------------------------------
KYLIE COSMETICS KRIS COLLECTION MINI LIP SET SWATCH-REVIEW + DUPES!! | Beauty Banter - Duration: 10:50.
Welcome back. Thanks so much for stopping by today have an exciting video
I'm going to be demoing and swatching and reviewing for you the Kris Jenner and Kylie cosmetics mini lip bundle
So if you want to see I'm also going to be including some dupes. So if you want to see
Me try on all these lipsticks and lipglosses keep on watching
Okay, so I'm gonna try to go from lightest to darkest just so that the color is the most true that it can be on
My lips also if I do have a color that's similar in my collection. I'm going to be swatching it next to the color
So you guys just can see some different shades for comparison again. I don't have colors that are similar for every single
Color, but when I do I will definitely swatch them next to each one
All right, so I'm just gonna jump right into swatching
Okay. So the first one I'm going to put on is the really gloss it is a light
nude shade
I do like this gloss. It's a very natural color. It's really similar to the color of my lips already
It feels really nice and hydrating on the lips. It's not sticky
It's a nice formula. I actually like it better than the original Kylie cosmetics gloss that I have from a few years ago
That one's almost a little too clumpy and thick this one is really nice. I have to say
Okay, so the next one I want to swatch is driving me crazy
It's another gloss. This one's a lot more pink than the first one. It's almost like a pinky peach shade
As
It's kind of nice smell to it mom's it's like frosting a little bit. It doesn't taste like that, but it has a nice smell
The applicator is really really teeny-tiny
Which I don't mind, but if you have a lot of lip surface area
It might take you a little bit longer to coat your whole lip
But it is nice because you can get like right up against the line of your lip and up into your Cupid's bow
Cuz it's so little
so this is
Driving me crazy
Same exact formula is the other one really hydrating and nice feeling on the lips
Not sticky at all, and I think the color is really nice this is definitely the type of gloss color
I gravitate towards so I like this one
There are definitely a lot of glosses in this collection which is unique for me and I don't usually buy glosses to be honest
I just don't wear them that much I prefer matte lipsticks. But I think you know Kris Jenner is definitely a gloss girl
So I'm not surprised. There are a lot of new glosses in this collection
And I think that's probably really appealing for a lot of people that enjoy gloss because you can never have too many new classes
So this next class is definitely a darker nude it's got peach warm undertones
so it's Peecher than the first one but definitely not nearly as pink as the one we just did and this is called this is
everything
I
Like this shade as well. This is definitely more of a natural
Neutral nude I think it's probably pretty universally flattering
It's definitely really close to my natural lip shade again, but it's just that little bit of enhancement
which means it'll probably also go really nicely over other lip colors if you want to kind of tone it down a little bit or
Just make it more glossy
same exact formula again
It's a nice shade
Okay, so now we're gonna dive into the velvet
Formula and for those of you guys that don't know the velvet formulas are kind of like a satin finish
They do not dry down to a solid matte so they will transfer throughout your night
what I like to do for this formula is blaah off all the excess so that you're not leaving lip marks on like every single
drink that you touch throughout the night, but it will not dry down to a
Non transfer proof color it will transfer. Um, but a lot of people say it's a lot more comfortable to wear on the lips
It's a lot less drying than the mattes and I'm personally a fan of the velvet formula again
It's a little bit more annoying because you will have that transferring going on
But it's also comfortable if it does tend to stain your lips
Which I like because as the color wears off your lips are sort of stained with that color throughout the rest of the night
So even if the sheen wears off you still have a little color left behind which I like
So this is too blessed and this is a darker pink shade. This is like a rose. I
Would call this a rose color
Again because these are minis everything is smaller including the applicator
Which again? I don't mind because it does allow you to be a little bit more precise. This is to blessed
It's a nice kind of neutral rose color
I also can say it's a full coverage formula and you can see it still has a little bit of Sheen
It's not going to dry down totally matte, but I didn't have to go over a ton of times
I don't have any streakiness with this shade. So the quality is definitely there for this one
All right, so the next bell that we're going to look at is overwhelmed and this is a deeper shade
It's kind of hard to explain it's kind of like a brown undertone plum
Again, definitely super versatile super wearable. I can definitely see more mature women wearing this
This is definitely a shade
I'd be more apt to wear in the fall and winter time versus the spring and summer just a little bit more subdued a
Little a bit darker, but still a pretty shade. And again, we have that full coverage formula. There's no streakiness
No patchiness whatsoever. I only needed to dunk it in once for the top and bottom lip
So I'm actually pretty impressed so far with this collection slow mini lip collection
All right, so the next one we're going to swatch is the second-to-last velvet it's called middle finger and it is a
bright orange red
It's actually the whole entire reason I purchased
this mini collection from Kylie cosmetics because I saw Jaclyn hill swatch in on her review video and I was like
I need that shape because I'm obsessed with red orange e as you can tell by my nails
I'm obsessed with the red orange color this season and I also think it's just super flattering on my skin tone this particular red orange
Again it's a velvet
So when I got it
I was actually really worried that it was going to be an exact dupe of hot fire
From the desi Katy collection with dose of colors, but it is actually more red than that
That one is a little bit more orange and a lot brighter. It's almost like a neon
This is more subdued and definitely darker and more red
This is probably my personal favorite shade in the collection
And again, as long as you tap off the excess on the outside you can get this to last you pretty much all night
Which is nice
Just make sure to tap off the Machine layer
Okay, only two more to go so the last velvet formula is called that's wild it's a deep
Definitely a cool read
definitely dark
it's funny because a lot of these shades really remind me of like
fall and winter shades
So again, this is that's wild it really is a nice wearable red
One more shade left it is the only mapped shade in the collection them only matte formula shade
It's another read but it's definitely a more pink based read so
If you like mattes you might want to pass this collection because this is the only shade you're gonna get
In that formula, this is definitely another nice shade. I really don't dislike any of the colors in this collection
I like how it's more pink based
I prefer these types of Reds on my skintone versus the really cool
Burgundy based Reds and I feel like this is a bit more appropriate for spring and summer. It's a little bit brighter
It is her traditional matte formula
so it's going to be much much more drying but it is going to completely dry down to a non transfer proof formula, which is
Really great for us
Today subscriber shoutout goes to Tessa Smith. I think I've already given you a shout-out but you are such a
Positive and loyal subscriber. I wanted to give you another shout-out. Thank you for commenting on so many of it my videos
Thank you for also, following my Facebook page
I really really appreciate your support if you want any subscribers shoutout
Don't forget to leave me a comment below and hit the notifications up and I would love to show you some appreciation on my channel
So overall, I'm happy with this if it does come back in stock, and if you like this color palette
There's a lot of Reds there's a lot of nudes and there's a few like really really wearable pink burgundy type shades
So if this is if this is the color palette you love the quality
Is there the formulas are there 100% so if you love these colors I say if it ever comes back into stock
Knowing Kylie cosmetics, who knows but if it does definitely get your hands on it
It's 42 dollars and you get a bunch of colors. So that completes the video guys. I really really hope you liked it
Definitely give it a thumbs up
If you liked these lip swatch review videos and I will do more for you check out the community tab for updates
Leave a comment below letting me know. Do you have this collection? Do you like it? Would you buy it?
I want to hear all your thoughts in the comment section. So I'll see you minutes. Alright
My lips are not gonna lie feeling low but numb right now
-------------------------------------------
MVWSD's Year in Review 2017-18 - Duration: 2:00.
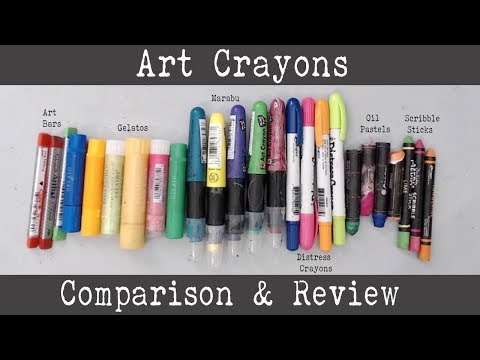
-------------------------------------------
Art Crayons | Comparison & Review | Water Soluble Art Crayons for Mixed Media - Duration: 54:32.
hi everyone its Keren here and welcome back to my channel today I'm really
excited because I am going to do a comparison video between all the
different art crayons that I own and that are on the market so meaning not
all the crayons that are in the market I own but all the ones that I have I've
pulled out there are six different kinds that I'm going to be comparing today
they go by different names depending on the company but they all have a crayon
like consistency and they're water soluble that means that you can blend
them with water and they can be used as watercolors and I am going to compare
different techniques with them not so much the techniques of how to do things
you can go and watch different techniques on how to use each one of
these in separate videos I more want to compare between them doing the same
technique and using the same mediums underneath I'm going to tell you which
ones I'm going to be comparing today I'm gonna be comparing the Tim Holtz
distress crayons the Dina Wakley's scribble sticks, the Marabu art crayons
the Prima marketing water-soluble oil pastels the gelatos and the Derwent
art bars there is definitely other water-soluble crayons out there in the
market like the ink tents and the Neo colours inktense is also buy there went
while the new colors is I can't remember the condom of the company but it can
definitely check those out what I want to do is I'm not gonna be giving you an
opinion I love all of these so I'm not gonna give you an opinion and which one
is the best or which one is the worst that's not the intention of this video
what I really want to emphasize is for you to see how they react in different
different techniques and then you can decide what's most convenient for you
what you would think you would use the most
you could choose like two of them or you know if you maybe don't know how to use
some of these then this is an opportunity to see them and compare them
to others so if you've had some let's say sitting there and you don't know
what to do with them this is a great way of watching this video and learning
or you could just let if you don't have any of these are crayons and you've been
thinking of getting some then you'll know the difference I'm hoping that I
will not say anything opinionated in either way sometimes I go like wow and
amazing but I do love all of these equally so I just want to compare the
different crayons and just not specifically as I said the given opinion
but just to show you that there's different options out there in the
market and I'm gonna try to compare colors that are similar to each other as
much as I can so you can really see the difference so let's get started so for
the first paper that I split into six sections and I put the names on each one
I picked some blue colors from the different sets and at the end of this
video I will definitely talk about the price point and how many communists said
how much it is individually to buy and how it works but right now I'm just
going to experiment with the actual prions and just wanted to let you know
I'm listing all the links to all the products below in the description area
so you can definitely go ahead and choose and pick and decide on price
point depending on what you want to buy if you were looking to buy some crayons
and this is the best this paper is a watercolor paper this is a cold press
watercolor paper this is the Prima marketing one but any of the cold press
ones will work this one is untreated there's nothing on it no just so no
nothing and I just want to show you how they react with this so I'm going to
make some marks this is the gelato then the marabou cream another marabou I did
not have the exact blue so it's gonna have to be this blue now when I am
flying them here the mayor the Emir abou is definitely creamier than the gelato
the gelato is usually very creamy but the marabou seems to be more creamy when
I'm adding its in terms of smoothness let's see about a distress crayon
Oh actually now this is really really also really smooth that distress crayon
goes on really smoothly almost like butter as well so so far this one is
even smoother let's go with the Prima marketing smart kid this is more acts
like a crayon not as smooth as the other ones and then I'm going to do the
scribble sticks this is actually the hardest ones it's almost like a pencil
you can hear it also in the sound right so the smoothness you can hear in the
sound so just in comparing smoothness this is the least smooth out of it this
is this most smooth second and these are about the same and let's see about that
there went art bar yeah it's not bad not as smooth inking also like a cream very
similar to the scribble stick okay so now that I put all six of them I want to
try a couple things I'm actually going to try it with my finger and see what
happens if I can actually blend it so
you can blend but I'm really putting a lot of effort but that has nothing to do
I don't think with the actual crayons you see they blend really nicely but if
I had just two underneath this it would blend better this one is blending a
little bit better yeah so the creamier they are the better the blending yeah
this one is blending as well why did I think this was blue it doesn't look like
blue it looks like black but it is like a dark blue I think okay let's see about
this one so I am putting a lot of effort to blend these but I think that's
because as I said there's no there's no art there's no gesso underneath
I can't blend the scribble stick when there's no gesso underneath same with
the art with it there went one okay so this one blended the marabou blended the
best on on this unprepped watercolor paper now I'm going to try it with a
wipe and I'm going to try on this one so let's see yeah so this one blends and
I'm more looking to see if there's any markings so it blended really nicely
this is the gelato blended really nice certainly and no markings were left on
that so that's nice sometimes there's a lot of lines and markings that are that
stay on marabou beautifully how it blends very
nicely okay let's try with distress crayon oh
there's the blue coming out yeah also blended really nicely on watercolor
paper and let's try the water soluble oil pastel very nicely I mean I think
like when you have the good quality watercolor paper it makes a huge
difference okay let's try this scribble sticks also blends really nicely you
don't see any lines and the last one is the Derwent art bar and as well so in
terms of blending over this watercolor paper this is the cold press watercolor
paper I'm quite impressed with it now we're gonna do the test with the actual
water called water paint brush and I'm going to take this one this one just has
water in it already and I'm going to
blend it together and I want to see what happens when I blend it up beautiful so
the gelatos of course blend up and blend nicely together very nice so
let me just clean the paintbrush and
there we go so a lot of them blend really nicely we've been with water so I
really like that so far so far I love every single one of them I love how they
blend the intensity of it beautifully
okay let's see about the this one the Prima one also really well I put some
more water so obviously the more water you put the more it will blend let's try
the scribble sticks now so the scribble sticks give you a lighter effect because
they don't they don't go as as much I mean you can still see an intense color
in it but it's not it's different you can see it's they're more translucent so
let's go with that the scribble sticks are more translucent let's see about the
Derwent one the Derwent are also more translucent but you can still blend I
like it that you can still blend the colors underneath so that's really
really good so there we go so the comparison so far I mean they're all
amazing to tell you the truth I can't even tell you which one I would choose
over another I really can't but I just really like
this so okay so this is the first test this is on an untreated paper this is a
cold press watercolor I'm going to bring now one that is already treated with
gesso this is also a cold press watercolor but in this case it doesn't
really matter once you put a coat of gesso it doesn't really matter what type
of paper you have underneath as long as it's
coated with just so you're gonna get a different effect so that's the beauty of
it so let's start with this one so I picked some purples because I'm bored of
using the same colors all the time I don't like always using the same color
so I thought I would compare purples instead and this paper is prepped with
white gesso this is the Prima finna bear white gesso and I give it just one coat
and it will give a different effect the blending will be easier and I really
want to talk about why art crayons they are so easy to use the water-soluble
crayons are just easy to apply you can cover a surface really well they're
amazing for writing you can also use them for sort of variety of things so
that's why they're so cool to have because you can use them for so many
different things so I'm going to start again and this time I will start again
with the de purple this is the gelato I'm gonna do the same thing so I'm gonna
create these circles again not as smooth as the other one let's see about the
purple from marabou and the nice thing about marabou you can move them up and
down you can push the tip up I think like the stress Karan's are the crayons
are the same how are the gelatos to the only ones that I like these without that
you have to just peel the paper are these other three okay so variable
crayons yeah very smooth like I said even on the
under white gesso then let me try the Tim Holtz ones
yeah the Tim Holtz ones are actually quite creamy on anything basically
I did the circles backwards but that's okay you'll get you'll get the idea so
let's do the circle the same this way so it doesn't get confused and the last one
is the Derwent and obviously you can see that within the different companies
there is different colors and some of them have so many sets that you can find
a variety of colors of them so for example Tim Holtz has so many sets of
colors well there went or Prima or even the mayor blue crayons and the Dina
weakly come with less less colors less variety so that's another thing if
you're looking for a lot of variety obviously you have to pay for that
variety but if you're looking for a lot of variety then this is the place that
you can you can basically find them this is the Tim Holtz has the most variety in
terms of colors okay so let's start blending with our fingers and it's a
little bit easier to blend this way let me get the wipe so I can especially the
marabou wow this is really blending easily not as easy for the Tim Holtz
which I am surprised I thought it would be same with the prima ones so compared
to this one I remember well we already put water in this but it actually
blended oh no they blended with wipe much easier than obviously with with the
finger but I just wanted now if I wet my finger and I actually apply it you can
get a better blend obviously so the wetter it is the better that's why
they're called water soluble and this one doesn't do it at all so now I am
making mistakes as I see and I'm blending the wrong thing but it doesn't
really matter I just want to show you so for example
with the wipe okay you see how how cool this one
has the jet so you can actually blend and you can actually also remove so the
cool thing about having the cool thing about having gesso is that it blends
really nicely it doesn't blend as intense but it blends really nicely and
you can also remove which is nice if you make mistakes let's try the wipe with
this you see it's like a different effect all together beautifully how they
blend I love it ok so it becomes an actual watercolor before it just became
a blended crayon well now it's an actual watercolor
effect and the lightest one still blends completely but the lightest one is this
one I think the intensity of the crayon so maybe it's the strength of how I put
them makes a difference so in terms of the watercolor now huge difference how
it blends right because you can really create that watercolor effect you
couldn't do that when you didn't have a gesso so I really love the watercolor
effect of this how cool is that so you can create really neat effects with the
watercolor the gelatos especially blended really nicely hold on let me put
some more water so I love how this is giving me a more smooth finish as
opposed to the gelatos are giving me a more of a watercolor effect this one is
more like paint it almost feels like paint it's hard to explain but it feels
like paint let's see about the art crayons
also this is more like paint you see how it's more intense it doesn't give me
that watercolor effect I mean it could but it just continues it has so much on
it that I could paint the whole block with this so it feels more like paint
than anything else let's try with these this is a prima one yeah a little bit
more like watercolor ish let's try with the scribble sticks also very watercolor
it should this one because it's not as intense it really gives you that
watercolor look I really like that as I said I like all of them but some of them
gives you different effects this is why I like having all different ones this
gives you the lightest watercolor out of all of them and that's nice to see as
well so that's really cool I will put these aside just so you can compare the
Jes old one and then on gesso one so this is the gesso you can see let me
compare apples with apples so there is the first two right so they it's more of
a watercolor effect as opposed to an intense effect then you have these two
which is the marabou crayons and the Dena Wakely ones you see the difference
in the effect and really huge difference in terms of the intent I mean that there
went art bar so when you add the water with the gesso was a big difference this
is more like paint while this is more like a watercolor okay so these are the
two that I'm comparing I will put these aside and I'm gonna bring a third one
here for this one I wanted to compare the different Gesell's so you so hard I
added the white gesso and I wanted to see we would work the same on clear just
so so I put a whole clear gesso coat on the background and then
added a little patch of the black just to see how it would react on clear gesso
and how it would react on black gesso and I'm going to switch the colors as
well okay for this one it has the clear gesso as I said and the black gesso and
I grab some green crayons and I'm going to make smaller patches because I want
to try a couple of techniques on them so I'm going to just make small lines here
and the next one is the marabou so obviously there's advantages of and
disadvantages to everything each company makes their own unique way
of making these crayons so you basically have to figure out what you want the
most what kind of things are the most important to you whether it is price
value whether it is intensity of color whether it is what comes how many the
type of colors the amount of colors they come in so there's so many different
things to consider this is why I was saying that you need to figure out
what's the best thing for you oops I just realized I didn't put this one here
so so far they're being applied the same way on the clear gesso and the black
gesso this is clear just so and black gesso from Prima marketing but any clear
gesso black gesso would work so that is fine to do as well so I'm going to go
straight with the watercolors no need to do the wipe test it's probably the same
I just want to go directly with the paint brush and just blend them and of
course you can see that they blend beautifully let's try on the black so
they go beautiful on black as well and you can also use them and blend them on
black let's go to the next one I just wanted to see how far it goes so
I see this kind of they have a lot of pigment all of them do okay so you can
see how far it goes same with this one the marabou ones look
perfectly on black as well so you really see that there is a huge similarity
between all of them and of course I don't know how much I'm applying of each
one on the background so some of them might look like they're not as intense
but that's because maybe I didn't add as much right so you never know you what
you want to see is blend ability you want to see that it looks like
watercolor that you can add it to different things
so that's beautifully as well so really nice to be able to blend these so I
really like all of them and you can see the difference for example this one as I
said before these last two always blend a little bit lighter than all the other
ones which is advantage if you don't if you're scared of doing things and you
don't want to put a lot of color as you can see this is almost translucent you
barely you can barely see it well the marabou you could see it really well I
wonder if it has to do with how much I applied so I'm going to test that I want
to make sure that it's not me putting too little on so I put a lot more now
and you can see they're still becoming translucent so it has nothing to do with
the amount that I'm putting on same with the Dare wind so let's start with this
and go ahead and do experiments at home if you have the other one if you have
the neo colors or you have a inktense then you go ahead and you experiment
with them so the same with these ones that there went is kind of more
translucent which was something that we already saw right we
already knew that they were more translucent another thing that test that
I want to do is the paint test from the are crayons so this is where you get
some wetness hold on I'm gonna get some wetness on this and I want to see if I
paint with them this way so here we go so there we go you see you can you make
your own watercolors with these right you could take pieces of these all of
these and you can make your own watercolor so that's the beauty of them
but you see when you're painting like this the watercolor doesn't show on
black as much let's start with the marabou crayons how it works again same
thing you can really make beautiful watercolors with it so this is really
nice so they don't show on black when you do the watercolors okay let's start
let's take the Tim Holtz crayon same thing so I'm testing that tip to see if
how intense is the watercolor I can create I've seen people put pieces of
the crayons inside little bottles and put in water and mixing it and making
your own spray so there's lots of ideas out there this is why I said this is
only to show you the comparison it's not to give you all the ideas for creating
so all of them have the same similar effect that you can do by painting with
them like this so that's good to know let's see with which one am I missing
all the Dina weakly well so all of them have the same effect
they all are amazing in terms of creating watercolor again following the
same thing these are lighter the last two so if you are looking for something
that is a little bit lighter that is not as intense because
you'll like it when it's lighter than this these are the colors to go with
these are the crayons to go with I meant to say so they all have a similar effect
that way so that's good okay so this is why I cleared it with the clear and
black gesso and I just want to tell you one thing the one thing that thinks that
the gelatos has is it has the metallic colors and I think that the stress
crayon have a couple colors I think they have the gold in the silver but all the
other ones might have it I am actually not sure I know prima dozen Derwent
might have in the inktense ones but not in this art bars but then gelatos have a
set of metallics and I want to show you how nice they look on a black so they're
quite intense and you can kind of see the shininess of them I don't know if
you can on this thing but you can see that there's shinier they're kind of
shimmery and they work well on both white and black obviously yeah but you
really see the shimmery on the black so that's one thing that I wanted to add
that the gelatos have that really nice shimmery color as well as their matte
colors as well okay now I want to work on this distressed paper from Tim Holtz
this is a really high quality paper mixed media paper and also can take
watercolor so I really wanted to compare to see how it looks on this and I picked
some pink colors this time so you could see the difference now the Derwent color
does not have a pink I went with a red in this one another thing I wanted to
say is that the gelatos they come in a bigger size they come in the double
scoop size so you can cover more area especially for large projects so you
could always get those as well the only thing with gelato sisters there's so
many colors they have the regular colors and then they have the metallic colors
the pastel colors them the neon colors they're so so many so it becomes really
expensive when you need to buy but there are so many
and kinds of colors right so if you want to have a lot and you don't care about
how much you're spending so definitely go with something like gelatos or
distress crayons which are have a lot of different colors or you could get a set
like like the Prima one which has 24 colors already or the scribble sticks
have two sets of twelve colors so I'm going to talk about all those after so I
know I get distracted sometimes and go off-topic
but I will compare these ones as well another thing I wanted to compare is how
to create water color paint on my mat so I always work on this mat this is a
grayish color mat it's the Ken Oliver mat and it's the large one it covers
almost my whole desk and it's really good because number one it's clingy so
things don't move as much when you're working on them and also it's really
easy to clean I've caked it on with so many things
here and it's so easy to clean another thing I wanted to talk about the art
crayons is that talking about cleaning is that they're so easy to clean because
they're water-soluble they're so easy to clean so first I'm going to test one
line of them like this and then I'm going to create color with them so just
to make sure that I know where things are I will put them in front one of the
things that bothers me about some of these is that the lids I tend to lose
lids all the time so the first three that I'm working with have these lids
and always searching to see where these lids are the other three the ones that
comes in the set don't actually have lids so the nice thing about them does
you never ever lose the lid I'm always searching for the lids on my desk I am
not very organized so that's the only thing sometimes that annoys me I wish
that came with no lids but what can I do it protects them so that's why
so the diva weekly ones I want to talk about that they're actually the most
crayon like in terms of how they draw you could actually write with it and
stuff as well so it's really interesting seeing with these there when twins this
one is kind of very hard it's kind of breaking apart and it doesn't give me as
much of it so first I'm going to do the same thing I did before which is just
blend them and they blend beautifully on this distressed mixed-media paint a
paper however you see they're not blending all the way down like the other
ones did when they were on their gesso the gesso really helps things move along
so the as you can see the gelato didn't blend as much but these marabou ones
blending beautifully so I wonder if it has to do with the type of paper that
makes the difference each one kind of react differently let's see this one
this is the Tim Holtz one and it could be that I didn't put enough but it's
just blending on its own it's lightening that but it's not picking up too much of
the color let's see with the Prima one
so yeah this one is blending a little bit easier let's see the Dena Dena the
Wakeley one yeah this is also blending really nice I mean they're all blending
nicely but it's just depending on this one blends as well but it leaves a
little bit more of a mark so I'm not so crazy about that okay so now I'm going
to try and make my own water color with this so you can make your own
watercolors by adding oops wrong ones you can make your own water colors by
adding water to them so you can make light watercolors with them
and this works on anything you see how it you can paint with it it's hard to
see that it's there but it is definitely there not with the marabou same thing
this one obviously is a little bit of a darker color so it's more intense but
again the same thing you can make really nice watercolors with it with a distress
crayon same idea let me put a little bit more it feels like it didn't have so
much because I really want to see if it's the intensity I mean sometimes it's
just how light I placed it on yeah you see now it blends more and it has more
intensity to it you can use these type of paint brush which is like a
watercolor fillable refillable paint brush or you can use regular watercolor
paint brushes it's up to you same thing works perfectly this way love it that
way yep now let's see about the scribble sticks same thing so you see depending
on the intensity of how much you put there they will paint as well so I love
that and this paper from Tim Holtz is great for that you see here pieces of it
came off this is what I meant by you can actually create your own intense
watercolor spray so the more you put of these crayons in other a bottle or you
know in some kind of dish and mix it with water you get a more intense color
or intense look to everything so this was a nice experiment or you see that
you can use them this way as well the last paper I want to try is a hot press
watercolor paper this is a hundred percent cotton and it's a little bit
different than the other one which is a cold pressed one and I wanted to see if
there's a difference in them and I did not prep this one as well because I
really wanted to see the difference I grabbed some orange colors I do not have
the orange from marabou so I'm using yellow instead but I just
to kind of show you the difference and I'm gonna do the same exact thing as
always just to see if it reacts differently on the hot press watercolor
paper which is a smoother better quality watercolor paper so I'm going to do a
little bit different this than the other one in terms of how I'm placing them
just because I want to try something else as well so they're going really
smoothly on this is a smoother paper you could probably also use the Bristol
smooth paper from Strathmore there any Bristol smooth paper wow this is really
smooth this paper is amazing I mean it's not cheap I've just bought it because I
wanted to use it for certain projects and I am wasting one of the papers for
that but that's okay because I really want to show you how they work on these
as well scribble sticks
and there went all right bars this is also kind of a red I'm sorry I should
orange but that's okay it's an orange e red okay so I'm gonna do
I'm just curious actually how smooth a we'll go on oh yes you know it's really
smooth especially the marabou well marabou really blended smoothly without
any water let's see about this one this one does too so these three blends and
nicest without water all on this paper sorry I'm just grabbing a wipe and let's
see I'm trying to use different fingers so they don't blend so this one without
water obviously and this one for sure not so I think these ones have a little
bit more of that paste enos then these two so that's why they blend that way
now we're going to do it with the wipe like I did before and let's try it with
the wipe with this one so so you see how can you can create really cool effects
with wipes as well maybe I should start with the top nothing
so this one has a little bit more intensity to it but I think it has also
to do with them colors I choose I mean even this Yale is pretty intense and it
blends really nicely this this one left a little bit more like lines than these
two let's see with the crayons not blending is nicely on this paper which I
thought that everything would so that's okay so far this one blend these two
blended the best but with gesso it would blend them beautifully like I you saw
before the scribble sticks leaving a little bit of marks but I can still
blend them more and lastly this one
it's the least intense of course right it most of it comes off so I'm going to
do the test with the water as well yeah so you see how nice how nice this blends
but it does leave like it does leave that circle in the middle let's see with
the yellow yeah this one blends much easier look at the marabou crayons blend
beautifully on this paper really really nicely you don't even see a line
anywhere where the gelatos leave the line same thing with this this one
leaves a line so unless you don't want these lines you definitely need to use
some kind of gesso underneath and then you will not see that let's see here
so so far the marabou crayons blended nicely all the prima ones are blending
nicely as well so it all depends on the formula that the crayons were made with
let's see Dina weeklies lands beautifully on this paper and finally
let's see what this one yeah dosoo blends really nicely doesn't leave any
effects okay that's good that's good to know so I really like that and now I
want to see if it will work with the stencils so let me see so I'm taking
this stencil and I don't think it's going to work on these type of surfaces
actually maybe I'll do it a little bit differently so I'm going to apply here
on the side so I'm going to compare this one and I'm going to do it on the other
one as well with the gesso so one of the techniques
that I love doing is doing like a masking or ghosting and one of the best
ones is to do it with stencils I am going to apply more color here there's
that
and let's see how it works with the different ones okay so I don't have
space here so I'll have to do it over here okay so now I'm going to put the
stencil on top and you're gonna see what I mean
and this you can do in larger areas as well so you could work within a stencil
and create patterns so you're removing some of the color from the gelato so it
does work on this type of paper and it is not just underneath usually it works
better when there's gesso but it's working beautifully with this as well oh
it looks really good like that let's see what these ones yeah so that looks good
yes it's working I'm so happy I wasn't sure if it was going to work on these
type of backgrounds but it does so you see it creates really cool patterns by
removing some of the intensity you get these really cool patterns in the
background so this one thing it works just as well I think I put too much and
you can still see the lines and this works as well if you do it on the one
with gesso it looks really it works really really well so for example let's
see if it works with ones that it's already been done so for example you
could put the air-crane art crayon on dry it up and then come back and still
have a reaction with the water it will still react with the water and create a
pattern that's the beauty of the crayons these are great techniques that you can
do you can remove things and create those really cool patterns so I'm trying
to see if they will all work the same especially when there's gesso underneath
things work much better and you can remove it much easier this effect is
fantastic when you have just so underneath you see there the intensity
of it is much better let's use a little bit of a smaller
area here boy I just dirtied that did not mean to do that you see how nicely
it removes itself so that's what I love about it the crayons that they're so
easy to remove there we go I think it's dirty from something else
the lighter the color obviously the lighter the effect but there's so many
different techniques that can be done with these crayons really ridiculously
amazing techniques and you can see all of them everywhere so let's talk a
little bit about the price point okay so let's start with the gelatos as I said
gelatos come in so many colors I can't even count them and I do have price list
here on the side actually went and looked that up so in terms of gelatos
and let's go with these let's put up without the ones I used and also the
bigger one which is a double scoop it comes in a bigger size it comes in a
huge variety of colors and all you have to do is just either buy them in
packages or individually for example each one of them individually can cost
between $2 and 250 and all the prices I'm talking about our US Dollars and of
course you can get some one sale in different preset places but the sets for
example a large set that has like 33 colors can cost like $50.00 while a
smaller set of 15 can cost $25 and things like a small sets I have like
only six of the same colors so there they group them in two colors the dose
can cost about $10 and sometimes you can get them on on sale like I mean these
are like the retail price that they go for but you can definitely find them
cheaper in different places in terms of availability there are highly available
in many different stores both online in brick-and-mortar stores and a lot of
people carry them these are they're basically almost the original
it's by faber castell so there is just lots of different colors that you can
use with these so that's these are really fun the next ones are the marabou
crayons and definitely these are the newest ones I've played with recently I
hadn't played with these before and it come in a variety of colors but I only
have a few colors only because these were sent to me now not everything that
I am talking about today was sent to me a lot of the things I've bought myself
almost actually everything I've bought myself except for Mary the marabou
crayons everything else I've purchased with my own money so over the years I've
wanted to experiment with different things I love the different
consistencies of different products so it makes a huge difference for me to
have a variety in terms of these I love love love the fact that they're longer
and have more in them and you can roll them up and the only thing as I said is
the little lids that get lost everywhere but other than that I would say these
are the creamiest out of all and I love them just as much as everything else but
these are basically the creamiest the ones that I found the creamiest in terms
of the marabou they sold they sell individually for about $4 each and or
you can buy them in sets of four for $15 but there's not a lot of colors not a
lot of colors like the gelatos or the distress crayons there is less colors
but as I said they're quite intense in color and very smooth the next ones is
the distress crayons and they come in little packages like these and they come
in sets of six I don't have all the colors these packages go retail for
about $13 but many times they're on sale so you could get them probably for like
$10 I just grabbed a few colors from here they come like this or you can put
them in a tin altogether there's about 10 different sets so there's a huge
variety of colors and as I say they're about 10 to 10 $13 per set and also you
can buy them individually for about 250 they're also quite creamy and really
nice to use individually or with water and again the same thing with the lids
you might lose them the only good thing is that it has the color late so you
which one you've lost and they can be brought out or in depending on how much
you want of it so it's almost like a lipstick that way
so the next one is the Prima marketing one and the Prima marketing one comes in
a set like this it comes with 24 colors and I took a few of them from this it
comes with 24 colors now this is a really used up set I've used this a lot
and they call them the water soluble oil pastels but they're still kind of like
art crayons the nice thing about this is that it's 24 colors and they go for
about $20 so they're quite inexpensive in terms of how much they cost and how
much you get for it because I've used these a lot I've used in I had a class
where I used to use them a lot I mean they look really used up they come like
that but it's not doesn't look nice when I'm showing you the ugly way they
actually come pretty beautiful inside with with all the colors listed in terms
of the shades so it's really nice and comes with many different shades of
blues purples reds blue you can actually see all the colors right here so those
have used a lot these are was one of the originals that I had be after gelato so
I had gelatos first and I had the oil pastels then I got their art sorry the
distress crayons and recently I got the scribble sticks and the marabou art
crayons so those are the ones that I have gone recently in terms of the
scribble sticks so they come I'll show you how they come they come in this
really nice tin beautiful nice tin and there's two sets of these they come in
this is the first set and let me just tell you that how much it cost they cost
about $22 for 12 crayons and there's only two sets whoops this is something I
was scribbling about so you see they come like this and you can the nice
thing is you can put them back in here like that
and you have it all set to go so you could travel with this and it's just
really nice to have them this way so I love the fact that the way they store I
love that there are not as intense about really blending nicely and they're good
for art journaling mainly like it's not so much for covering a huge area but
you're giving it a little touches to things and it comes with many different
colors I only have the first set I don't have the second one but I'm sure it
comes with more complementary colors to the ones that are already here so I do
like the tin because it doesn't flip anywhere in the Sun have lids that's the
one thing that I I'm kind of like don't want so many lids everywhere and finally
I want to talk about the Derwent art bar so this one somebody recommended it and
I ended up buying them and I haven't used as much they're actually made in
the UK as it says here there's a different there went I think is a UK
company also come in this really nice tin and come in different color
combinations I wonder if the ink tents from their wind would be something that
you would be interested more in but these are really cool I found them a
little bit lighter if you're looking for something a little bit lighter to use
then this is definitely the thing to go I like that they come in this individual
packaging and something like this which is the art bars they go for $24 they're
about $58 I think I got them on sale because I don't remember paying that
much but who knows maybe I did pay that much $58 for 24 and the inktense which
is the ones that I don't have now there must be very intense there's $65 for 24
and that's a retail price obviously that's not when you get some kind of
sale on them especially on like Amazon and stuff and the last one I didn't do
it's the Neo colors I don't have those but they go for depending on the size of
the packaging there you go for 10 of them for 1450 there is 30 of them for
like $43 and then you forget the whole set of 84 is a hundred and twenty
dollars and a lot of people swear by these you can go and check them out in
different other videos where people compare those as well
I didn't have them so I couldn't compare them but these are the ones that I
wanted to compare and I'm just really happy of the comparison I will show you
again what I did so this is the one where I didn't have anything on them and
this created beautiful effects on this cold press watercolor paper then we have
the one that I put the white gesso on so beautiful the beautiful blending and
also masking so it was really easy to do that I loved how they went on the clear
gesso in the black gesso as well some of the more intense ones are over here
while the lighter ones are at the bottom then I tried them all so of course on
the Tim Holtz distress paper so that's really really nice you see how nicely it
blended and it didn't need any type of prepping so that's some good paper out
there and the last one it was the hot press watercolor paper and you can see
that it blended beautifully as well so the nice thing about these is that they
blend whether or not you put gesso or not you can get different effects and
you can also create some beautiful things with them so thank you so so much
here I'm gonna put these there went ones here thank you so much for joining me
today while I talked about the different water-soluble crayons out there in the
market I try to cover as much as I can but I'm sure I forgot to say something
and of course always share your ideas and information with me as well I love
when you guys tell me about your experiences with the different products
I just can tell you as much as I know and sometimes I have more knowledge but
I forget to say it so if I didn't cover something just let me know thank you so
so much I hope you like the intensity of this video and if you liked it please
give it a thumbs up share it with your friends on social media that is really
really important for me if you share it then more people know about my channel
and subscribing is really important because the more views the more videos I
can bring to everyone so thank you so much and have an amazing day bye
-------------------------------------------
제 5회 서울 비건 페스티벌 리뷰 5th Seoul Vegan Festival Review | Yusun - Duration: 14:55.
Which one do I need to take this time??
Do I need to bring two??
I will bring this bottle
Oh! I need to bring cash! not credit card
Now it's 10am
I am eating watermelon
I went cycling & gym in the morning
Vegan life is so simple
Eat fresh fruits & plant foods
If you become vegan, you will see so many other things
If you can become vegan,
if have any question, leave comment
Hello~everyone
I will meet my friend later
I came here a bit early this time
It's gluten-free
Seller: We will be hard to find vegan tarte
Also it is very cheap
Yusun: Is it cheap???
Sauce will be delicious
This is made of fabric which is thrown away
This is so cute
Can I advertise something?
Yes, you can. I support vegan product !!
We published magazine called Trash!
So we are now funding
if you are interested in, please check this out
Hello~She came from Daegu!!
Awesome!!
I am pesco-vegetarian,
but it is still hard to maintain the diet
Daegu is a highly conservative country !
Was Daegu a conservative city ?? !!
It is really good to be here
Yusun: I was planing to buy this vegan shirt
This is chicken
Can you find vegetarian restaurant in Daegu?
Not much. So I have to eat carefully
I try to follow vegan diet at home
But I watch what I eat very carefully outside
Yusun: I was planing to buy vegan shirt
Why I could meet her is because she also wants to buy vegan shirts
But the clothes is too thick to wear in hot summer
So both of us couldn't buy that thick vegan t-shirts
She is pesco-vegetarian
She came from Daegu,
which makes me feel that she is awesome
We are eating the same foods
My friend left cuz she has another appointment today
Do you follow my instagram?
You can find me on instagram
I am trying to more on insta story
If you have instagram, you can follow me
I saw that some of the new vegan restaurants came
and sell some foods this time
I bought this dessert
This place is not in Seoul
So I am trying to eat their sweet
What I ate was from Spoon me
which was tasty
I know there are so many foods to eat
But I don't like eating any fried foods
Yeah, I don't like it
Anyway, this time there are packed with people
which is pretty awesome
This time I met several people
I slept early yesterday
Thank you so much
You say Hello to me first this time
Thank you so much
To be honest, it is not easy to make Youtube video for me
I do this, it's because I am vegan
I want to meet so many vegan friends
This time I was so happy to see you this time
And thank you so much for those who are willing to be on my video
I hope that I want to see so many healthy options at the vegan festival next time
You might feel that, there are so many fried, oily vegan options at the festival
If you followed vegan diet for a long time, you will look for healthy options
I am the one who want to see healthy vegan foods
I would like to compare other vegan festivasl in other countries
If you can invite me to vegan festival in your country, it will be so fun
See you next time
-------------------------------------------
S.H.Figuarts Iron Man Mark 5 review - Duration: 12:45.
Hello folks! Stathis here! Another Iron Man suit!
Today we will take a look at the S.H.Figuarts Iron Man Mark 5 figure.
This suit is from the second Iron Man movie.
As you can see I don't have his box because we bought it used.
But you can have a look at the front side of the box here.
And the back side of the box here.
So this is Iron Man. So let's see his accessories first.
First of all he comes with his suitcase.
His suit is hidden inside the suitcase, if you remember well from the second movie.
The suitcase cannot open but as you can see the paint is awesome.
Very nice sculpted details.
He comes with a set of karate chop hands.
He comes with a set of hands that have the pegs on.
And he comes with a set of relaxed hands that have the repulsors.
Also, he comes with a set of flying effects for his hands.
He comes with a set of flying effects for his legs.
And of course, he comes with a set of blaster effects for his hands.
So let's have a closer look to the details of the figure now.
And here is Iron Man from a closer view.
The first thing I noticed is the incredible paint of the figure.
Very beautiful red metallic paint! Very beautiful silver metallic paint!
It looks veeeeery nice on him!
As you can see, he has silver paint for his eyes.
Silver paint for his arc reactor as well. Nice silver details on his arms.
We also have nice silver details on the back side of his arms.
He looks very good!
I really like how they sculpted the back of the figure. Excellent details!
Nice silver details on the back side of his legs. They look very good!
He looks fantastic! Very beautiful figure!
His feet are made of die-cast. And he also has peg-holes under his feet.
So let's see now the articulation of the figure.
The head is on a ball-joint, it can rotate 360 degrees.
It can look up. It can look down.
It can tilt left and right.
The neck can move down but it's very tight.
It can move a little bit up. The shoulder pads can move up and down.
The shoulder has a very nice circular motion but be careful how you move it, not to scratch the paint.
The arm can rotate 360 degrees.
It can move up this far, it can move down.
It can rotate at this point here.
We have double-jointed elbow and as you can see it doesn't ruin the sculpt of the elbow.
The hand covers are removable and this piece here can move upwards, like this.
There is fist rotation. And the fist can move in and out.
There is rotation at the torso. The torso can bend a little bit backwards.
It can bend bend a little bit forward.
This piece here is movable and when you rotate the torso it is also moving.
The waist is very tight, there is waist rotation though.
It can bend forward this far. It can bend backwards.
You can bring the legs down, like this. The leg can move forward this far.
Can move backwards this far.
Sideways, this far.
The leg can rotate at the thigh. We have double-jointed knee.
The foot can move down this far. A little bit up.
You can lift this piece up, like this. We have nice ankle tilt.
And no rotation at the foot.
The toe can move up this far and it's very tight.
Iron Man has very good articulation, excellent!
So let's see his accessories now. Let's change his hands.
Let's put the hands with the pegs on them.
First of all, you need to remove the hand cover.
And you simply pull out the fist.
Let's put this hand.
Let's put the hand cover as well.
They are so small...!
I will remove this hand as well.
So small....!
Let's put the flying effects.
I will put the flying effects for his legs as well.
And he looks like this now.
Let's put the blaster effects as well.
And now he can shoot his enemies. And he looks like this now.
The figure is 15,5cm tall.
And a size comparison now.
Here he is next to S.H.Figuarts Iron Man Mark 3 and next to S.H.Figuarts Iron Man Mark 6 Black version.
They look great all together!
Here he is next to knock-off S.H.Figuarts Tony Stark.
Here he is next to S.H.Figuarts Batman Injustice.
Here he is next to a deluxe class figure, Legends Mindwipe from Takara Tomy.
And finally, here he is next to S.H.Figuarts green Power Ranger.
Final thoughts...these suits have started being very addictive!
The more I see, the more I want!
Very nice representation of Mark 5 from the second Iron Man movie.
He has very good articulation, nice accessories and the paint is fantastic!
If you like Mark 5 suit, then buy this figure without second thought! It is worth the money!
Stay tuned, product shots will follow up.
Thank you all for watching, see you in the next video, bye!
-------------------------------------------
Arby's® | Bacon Beef 'N Cheddar Review! 🤠🥓🍖🧀 - Duration: 5:48.
hey everyone its Ian K back again with another one for ya this time headed
into Arby's to check out an upgrade to a fan favorite sandwich they've got on
the menu that's right it's the bacon beef 'n cheddar so let's see what this
one's all about after we scoop it up to that drive-thru yeah peep this out
can I go for the bacon beef 'n cheddar the sandwich by itself and
that's it oh no that's it great thanks a lot no I've never had the classic beef 'n
cheddar I mean I've heard it's good so this is definitely gonna be a new
experience for me hey good my friend how you doin' nada nada but I've never had the beef and cheddar
before so this should be good actually with bacon too why not oh cool cool cool cool thank you oh no I'm good
I'm good thank you so much man I appreciate it we'll see ya they are
always so cool at this location alright you guys ready to help me scratch
something off the bucket list let's peep this out
it's an upgrade to a fan favorite here at Arby's with their bacon beef 'n
cheddar and right off the bat I am already digging the size of that toasted
onion roll guys I think it's got a pretty nice size to hold all the
goodness especially when compared to my hand definitely digging that let's pop
the top on it and see what we've got underneath it looks like starting with
the top some cheddar cheese sauce we've got three strips of bacon there actually
four a decent amount of pork on this one for sure and thinly sliced roast beef
guys the signature here at Arby's looking very very nice underneath that
let's see if we can go a little further and see what we've got
apparently this is supposed to be red ranch sauce but it kind of looks like
Arby's sauce to me but digging it already guys a pretty decent amount of
meat on this one and the cheese is not too bad and I absolutely love the size of
the bacon the amount of bacon that's in this let's give this one a shot this is
the bacon beef 'n cheddar here at Arby's let's peep out this flavor so I'm
already thinking that peppercorn Bacon's gonna add a nice dimension of flavor to
it already looks like a pretty tasty sandwich let's dive in it's the bacon
beef 'n cheddar here at Arby's you gotta love the signature roast beef here
at Arby's it's got such a distinct flavor to it and it's absolutely tasty
very moist very tender and a little bit of the bacon mixed in with that that is
a very nice combo as well some nice saltiness and my smokiness but no real
cheese yet let's keep going mm-hmm there it is oooo oooo yeah that warm cheese
sauce is pretty tasty the rich cheddar cheese flavor mixed in with a little bit
of the saltiness I'm getting from that and the bacon together is always a
pretty nice combo and then on top of the roast beef itself is pretty awesome I'm
tasting what it really feels like a little bit of Arby's sauce in the bottom
of it I'm not really tasting ranch I'm not sure why they're calling it that but
the flavor is a little on the sweet side but overall it's the meatiness the
cheesiness and the bacon guys that really stand out on top of the softness
that is the onion roll pretty good let's see if we can squeeze some of that good
stuff out of the top for you there guys as you can see it's a pretty healthy
amount of cheese sauce in the very top of this here so it really goes nicely
with the sandwich in general and I got to say guys the bacon is really adding
to it like I said bacon and warm cheddar cheese sauce is already a pretty killer
combo mix it up with that signature beef from
Arby's and you already know what you got here and yeah I repeated that breakdown
for you once up close because guys it's the simplicity of the ingredients that
really make the sandwich as good as it is and when things get to be a little
too complex with too many things in the sandwich you can't really taste anything
really at all except maybe one over the other but this all works because you can
really taste the cheese you can taste the bacon and obviously the roast beef
and then the onion on the backend that you're getting from the roll
is pretty awesome guys very very delicious on this one very delicious
just another quickie close up for you guys especially if you're a fan of that
classic beef 'n cheddar I'm glad I finally gave this one a shot and
thankfully with that bacon it really is a nice way to experience it for my first
time here I will be getting this one again for sure as well as the classic
version this is a pretty tasty sandwich but as always that's just my opinion
what do you guys think are any of you already fans of the beef 'n cheddar
here at Arby's and if you are how excited are you to try this with that
peppercorn bacon drop some comments down below and
definitely let me know and that's for my overall score I'm gonna have to give the
bacon beef 'n cheddar here at Arby's a very solid 8 out of 10 like I said it's
the simple things that make this sandwich work and it's got all the classic
flavors that you already know from Arby's on top of the bacon being added
to it guys so the onion roll is definitely a nice touch it's nice and
soft and over all the flavors absolutely work very delicious on this one and
those are my thoughts and another one of the latest items here at Arby's as I
close out another episode of peep this out guys and like I always say I've got
brand new content every single week here on my channel so while you stay tuned for
the next review coming real soon in the meantime stay frosty and because you guys
were so vocal about it in the comments section of my jalapeno bites when I
reviewed these a couple of weeks ago we're going in on the Bronco berry sauce to
see exactly how amazing this is gonna be with it from what I hear it is pretty
cool let's give it a shot it's definitely nice and rich and thick let's
see what all the ruckus is about guys the Bronco berry sauce and the jalapeno
bites mmmm yes I definitely see what you guys are talking about now I'm getting a
little bit of spiciness I think from the jalapeno and the sweetness from the
sauce along with the cheese combination on that very delicious with that coated
crust of the bite itself pretty awesome guys I see what you guys were talking
about mmmm alright everyone I'm definitely glad I took your advice and
until next time I'll talk to you soon
-------------------------------------------
BENETT T20 AQUA CORE | goalkeeperglove test & review | SHERLOCK GLOVES - Duration: 2:31.
Hello everyone today we are here to test and review
the Benett Ti 20 aqua core but how it will behave in the field follow us and you will discover it
The latex is the 4 mm contact aqua. One of the best latexes we've tried, the performance is excellent on dry
fantastic just moistened and good in the wet, even the resistance to abrasion proves to be excellent, the cut is a negative
The back is made of mesh and latex supersoft material
The result is a traditional soft and light glove really really very comfortable
The cuff is elastic as the strap that makes a lap on the wrist and allows an excellent closure
In conclusion, the Benett ti 20 aqua core is a great glove from all points of view
The only thing that has not convinced us is the quality of the elastic material of the strap that is damaged so easily
for today everything is
Do not forget to subscribe to ours. YouTube channel to follow us on Instagram and Facebook to subscribe on
Our telegram channel and a greeting to the friends of the sherlock gloves
-------------------------------------------
iDrinkCoffee.com Review - Slayer Espresso Single Group - Duration: 6:23.
Hi, I'm Slawek with iDrinkCoffee.com. Today,
I'm gonna be presenting one of my favorite espresso machines the Slayer espresso single group Slayer espresso has gained a lot of notoriety
Over the last decade or so for creating incredibly stylish incredibly unique machines that can be customized
You can make them look any way you like by changing different options on the machine
Really personalize it and they also make world-class espresso
This machine is capable of producing some tasty drinks to demonstrate the Slayer espresso. I'm gonna make two sets of drinks
I'm gonna make a double shot of espresso and then I'm gonna make a milk based drinks a cafe. Latte
I'm also going to discuss some of the features and some of the things that makes this machine
You know as special as it is the Slayer espresso is very customizable
This is a stock machine meaning that it's black powder-coat and it has silver X's
so these X's that support the machine at the side the legs are
Powder coated and silver, but all of that could be changed you can make the panel's different colors. You can change it to different
textures different
Metals all of the wood can also be customized
This is European Ash which is also the standard but there's different different types of woods like Caesar Cody bubinga
Zebra, whatever you like. You can also add an additional cup rail that's made out of wood and
Really make the machine personalized to your tastes
The single group comes standard with a display which gives you all your pertinent information
Here you have the temperature. I have my group set right now at eighty nine point five degrees
And one point five is the boiler pressure. So the boiler's at one point five bars and you have your date and
Time there as well that also acts as a shot timer and at times in two stages
Which we'll show in a couple of minutes
It shows the pre brew time and then your extraction time and it separates those two and that's really one of the things that make
Slayer unique, is that soft pre-infusion?
What makes the Slayer espresso unique and what makes it able to create such amazing drinks is what Slayer calls their flavor
profiling the machine has a
Patented needle valve and what that does it heavily restricts the flow of the water and it allows you to do very long
pre-infusions
there's no other machine that's capable of doing that the shot which I'm about to pull is gonna have a
20-second pre-infusion time and in the hands of a
Barista, or somebody interested in creating the best possible drinks. You can really dial in your coffee and make it taste amazing
It also allows for much much finer grinds. I can go superfine and extract more
Solids into my drink than on any other machine in the market
So for my first drink, I'm gonna make a double shot of espresso and I have to grind my coffee
I'm using a mahlkonig peak grinder, which is fitting because it's a great pairing
The peak is one of the best grinders on the market today
It complements the Slayer espresso very nicely
My coffee now
When I start brewing I'm gonna put it into the middle position which is the pre infused position and that
Starts the soft pre-infusion the Slayer has a shot mirror so I can see the reflection of my bottomless extraction
I can see the bottom of the basket and
Generally, I want to start the extraction when you start seeing the first droplets of coffee on that basket
I'm gonna be aiming with my grind here for just over 20 seconds for my pre infusion
And then I move the paddle all the way to the left and the full pressure of the pump comes on and the extraction begins
You can see I'm getting a very nice shot. It's almost all crema a
Nice brown color as well
Stop it right there. So this shot is actually has a 25 second pre-infusion and a
29.8 second extraction time, which is basically 55 seconds
The shot looks great on other machines
If you try it extracting this long the shot would be very bitter and very over extracted
But on the slayer you have that flexibility to really get the best out of your coffee
The next drink I'm gonna demonstrate is a milk based drink
I'm gonna do a cafe latte and I've already ground my coffee and I'm gonna extract my espresso first
And again, I'm gonna do my pre brew
again, I'm gonna do a pre brew of approximately 20 to 25 seconds and
While that's pre brewing. I'm actually it's gonna
Give a quick purge to my steam wand so I can get ready for steaming
The steaming power on the Slayer single group is is very strong. You can steam a
Twenty ounces of milk very very quickly
And I started my brewing there and I'll frost my milk
And one other thing I'm gonna do after my milk is done which is about now is
Another benefit of
the
Paddle group is I can actually also towards the end of my extraction go back into the middle position to ease up and ramp down
This is another thing you can do to really fine-tune that espresso
I'll stop it right there
Just add my milk for a
For an iced coffee cafe latte
With a little effort and in the right hands of the Slayer espresso is capable of producing world-class drinks
I drink coffee calm is proud to be partnered with Slayer for sales in Canada
If you have any questions about the Slayer single group or any one of Slayers products, please feel free to contact us
We're always happy to help. Thanks for watching
-------------------------------------------
[TECH REVIEW] Nerf RETALIATOR - the best Nerf Gun ? - Duration: 2:52.
Today I present you the Nerf RETALIATOR
It's a very popular NERF weapon
It is manual with a 12 darts
It consists of 4 pieces
The central part allows you to shoot
You can add a butt on the back
And lengthen the gun in front
Finally put your wrist in front under the barrel
To shoot you have to arm the rifle every time
I find it great
I find it great because it has several pieces
However, he does not shoot well
For example during the battle on the stairs
several times the dart is not gone
or the dart fell without speed
I do not advise the RETALIATOR for battles
Next week
Subscribe
Push the bell icon
Like the video
Thank you
-------------------------------------------
Ozzy Man Reviews: Cheese Rolling Contest 2018 - Duration: 2:24.
-------------------------------------------
2015-2017 Mustang GT Whipple W175AX 2.9L Intercooled Supercharger Kit - Stage 1 Review - Duration: 11:19.
Hey everybody, I'm Justin with americanmuscle.com and welcome to my detailed breakdown of the
Whipple Stage 1 twin-screw supercharger kit available for your 2015 through 2017 Mustang
GT.
All right, gang, as you can imagine, we have a lot to talk about here at the Whipple Stage
1 kit.
And in this detailed overview, I'm gonna do my best to break down some of the benefits
and power expectations when bolting this monster up to your S550 GT.
We'll talk about what's actually included with the Stage 1 kit from Whipple.
And then last but not least, we're gonna do a very, very general overview of the installation.
Obviously, guys, there's a lot of steps involved, and obviously, this thing will not be for
the first-time wrenchers out there.
So, an easy three out of three on my difficulty meter, but we will have a little bit more
detail on that later on.
So, if you're an S550 GT owner and you wanna go with one of the most popular blowers in
the aftermarket to help you add horsepower by the hundreds, the Whipple is going to be
a solid choice.
Now, let's be honest, guys, there's really no bad choice when it comes to adding forced
induction to your Mustang.
However, I think the Whipple will be pretty unique not only by design and what's included
with the Stage 1 offering, but this thing is also advertised as being the blower to
add the most horsepower right out of the box according to Whipple.
Now, with all of that said, this is gonna be a great choice for the GT owners who prefer
that linear power delivery of a twin-screw blower like this, you want the power on demand
as opposed to something that's gonna build boost like a centrifugal blower or a turbocharger
setup.
Also, guys, this is gonna be a great choice for people who don't wanna have to modify
their front engine cover like those TVS blowers that do require a little bit of grinding to
get installed.
So, with all that said, we got a lot of ground to cover.
Let's dive right in.
So if you've been toying with the idea of super charging your S550 GT, you've probably
done a little homework on the issue, but if not, here's what you're gonna find when you
look into the aftermarket.
There's gonna be a couple of big popular options out there.
First and foremost, you got your TVS blowers, companies like VMP, Roush, Ford Performance.
This is something that is very popular out there and definitely a solid choice in and
of itself.
You're also gonna find some twin-screw options out there, Whipple being one, Kenne Bell being
the other.
Now both the TVS or the twin-screw blowers are gonna be great choices again for those
S550 GT owners out there who prefer that really linear power delivery or that instantaneous
power.
However, that's not necessarily the case with your other popular option in the supercharger
category, a centrifugal blower.
Now, these guys are still belt driven, but they take a little bit more time to reach
full boost kind of like a turbocharger would.
Ultimately, a centrifugal blower will be a little bit more efficient than a twin-screw
blower or even the TVS blowers we talked about a little bit earlier.
And popular options in the centrifugal category include ProCharger, Paxton, and Vortec.
Now, any one of these supercharger options that we have talked about will help you add
all the power you want and more to your 5 liter GT, and we could really just break down
the benefits or differences between the two until we are blue in the face.
However, that's not the purpose of this video.
So what I'm going to encourage you guys, just make sure you take the time, do your research,
decide what kind of blower will be best for you and your driving style before you invest
thousands and thousands of dollars in the forced induction.
But with all that said, let's shift our focus back to the Whipple.
Now, Whipple and Mustang have gone together like peanut butter and jelly ever since the
Terminator days.
And Whipple's popularity has really spiked here with the S550 GT.
Now, at the core of this very potent package, you're gonna find the W175AX compressor featuring
2.9 liters of total displacement, a max operating RPM of 18,000, which altogether will help
you achieve boost upwards of 30 pounds depending on your setup.
Whipple did decide to change up the design a little bit here with the 2015 and newer
GT blowers.
They front feed rear drive design that they claim is gonna be a little bit more efficient,
help increase some of the plenum volume overall.
In addition to that, it also allowed them to increase the size of their intercooler
and the coverage here with the blower, which is huge when you're talking about a twin-screw
because heat is oftentimes gonna be one of your biggest issues.
Another big benefit with that front feed design is that Whipple claims this thing will be
8% to 10% more efficient than a side or rear entry design.
Now, one fact that Whipple is really happy to claim here with their 2015 and newer design
is that it features one of the largest inntercoolers in the category, in fact, up to 33% larger
than those TVS blowers we already talked about.
Another cool fact, this thing is bigger, 2.9 liters with Whipple versus 2.3 liters with
the TVS blower.
So by getting you 26% more displacement, Whipple claims that you're gonna see more power and
lower temps at similar boost levels.
Now, this is a lot of technical talk and a lot of numbers being thrown at you from Whipple,
but you guys are probably saying, "Dude, just tell me how much this thing will make because
that's what I wanna know."
So, here we go.
Whipple claims their base kit featuring the 2.9 blower using their factory throttle body
we'll put out 750 crank horsepower on 93 octane.
Now, their Stage 1 kit does include the 132 millimeter elliptical throttle body.
And they claim that this kit here will make 825 crank horsepower also on 93 octane.
Now, I have a lot of experience with these kits here at AM, and my experience tends to
back these numbers up.
You want more experience?
Well, here we go.
Our MMD by Foose silver GT that we gave away made 650 to the tire through an automatic
and basically nothing else, still had the stock throttle body on.
Our 2015 GT, the orange car that we did end up giving away with the Raptor made 740 to
the tire through a six-speed.
It did have the 132 elliptical throttle body, and it did have some other bolt-ons as well.
So, Whipple's advertised numbers seem to be pretty much on the money here when you factor
in drivetrain loss.
So now that you know what kind of gains are possible using the 2.9 Whipple blower on your
2015 and newer GT, let's talk about how it's all made possible and break down some of the
components.
We broke down the compressor.
We talked a little bit about the big intercooler here that lives on underneath the compressor.
You're also getting Whipple's trademark 132 millimeter crusher inlet and matching 132
millimeter elliptical billet throttle body.
And believe me when I tell you guys, the upgraded throttle bodies make a world of difference
on these Whipple cars.
Now, feeding that massive inlet and throttle body, Whipple does toss in an intake set up
for you guys, including an airbox, which I don't have on the table with me here, but
I do also have the high flow filter that is included along with the intake elbow featuring
a rather sizable 123 millimeter mass airflow housing.
They're also giving you a pump and reservoir that will hold up to two gallons of water
to feed that category leading intercooler, and Whipple claims that this two gallons is
more than double the next best option in the category.
You can also look forward to receiving your heat exchanger here.
No, this is not your intercooler, that lives underneath the compressor housing.
The heat exchanger on the other hand will live up on the front of the car here and cool
some of that fluid down.
Now, I do wanna point out Whipple doesn't toss in any fans with their Stage 1 kit, but
you can always add them if you'd like to.
In fact, I'd probably recommend that if you do plan on driving the car hard during the
summer months and you live in a warmer climate.
As far as your fuelling, well, Whipple does toss in a couple of really nice billet fuel
rails here and a set of 72 pound injectors which should be enough for most owners out
there.
Obviously, you can always upgrade these to a set of ID1000s or something even bigger
down the road if you like.
Now, in addition of that, personally, I might recommend adding a Boost-A-Pump to your fuelling
setup just to make sure those rails are getting all the fuel they need, especially if you
start to turn things up, which believe me when I tell you will eventually happen.
Whipple does also include a six rib belt setup in addition to all the idlers and pulleys,
tensioners, all that good stuff.
And in my opinion, we've had great experience with this, never really experienced much belt
slip, if at all.
Now, Whipple also tosses in a calibration with their Stage 1 setup to help you get up
and running, but if I can kind of contribute my two cents here again, and I will, take
this to a reputable tuner, guys.
You're spending a lot of money when you're adding forced induction to your S550 GT.
You wanna take it to one of the big names out there or a local trusted tuner because
not only are you gonna be maximizing your performance but you're also gonna help ensure
the safety of your setup.
Now, this isn't as important, at least in my opinion, but you guys probably will appreciate
it.
One thing I did really enjoy about this kit is just how well everything is thought-out.
From a packaging standpoint, the instructions are very clearly laid out, color pictures,
all that good stuff.
They've done a great job when it comes to getting this thing in your hands and making
it very digestible when it comes time for installation.
Now, necessary hardware, that's kind of a given, but little things like the correct
heater length hose, you're also getting the proper heat shrink, new plugs.
Complete is just the perfect way to sum up the Whipple kit.
Also not as important but definitely worth pointing out is that Whipple give you some
options when it comes to how you want this thing to look.
Obviously, we're showing you the black option here, but you can also pick up the Whipple
in a polished finish, maybe a red, white or blue or even gold.
So again, you have some options there when it comes to your under hood appearance.
Now, I'm not telling you anything you guys don't know here with this next statement,
but these things aren't cheap.
This is a big investment.
You're looking at 7,500 bucks just for the black option.
And if you wanna go with any one of those other colors I just mentioned, it's gonna
be a little bit closer to the $8,000 mark.
So yes, you're forking out big dough for forced induction, guys.
But again, this shouldn't come as any surprise to any of you.
On top of that though you do have to factor in some additional costs such as that aftermarket
tuning if that's something you are interested in, maybe a clutch if you have a stick car
and, of course, new tires as you're certainly gonna be blowing through them a lot quicker
than you were before.
But let's switch gears and talk about the installation, and this is going to be very,
very brief, guys, no, not the installation but my description of it because this is not
a step-by-step video.
That's not what this video is intended for.
Instead, Whipple does give you those very detailed instructions to check those out first
before getting started with the install and just to see if this install will be for you
or if you wanna call your local shop instead.
Instead, expect a full-blown three out of three wrenches on the difficulty meter here,
guys.
At least a full day in the shop or a garage, but a weekend is probably gonna be the better
bet.
As far as the tool list, well, it's safe to say you're gonna need them all here, guys.
You're gonna need a pretty expansive toolbox in order to complete this installation.
You will need to remove that factory intake manifold.
You're gonna need to disassemble the front of the car in order to get your heat exchanger
in place.
There is a lot of work involved here, guys.
So, again, I can't stress this one enough.
If you're not really comfortable with tackling this big of an install, call your local shop.
I'm sure they'd really appreciate the business.
And on the other hand, if you are the do-it-yourselfer type, just leave yourself a full weekend,
definitely a lot of beer because you're gonna need it to get this guy installed.
That is my review of the Stage 1 Whipple kit for your 2015 to 2017 GT, which you can grab
right here at americanmuscle.com.
-------------------------------------------
MIKSI KÄYTÄN PERUUKKEJA? | ElfWigs Review - Duration: 3:17.
Hiya! You may have noticed that I love trying new styles and almost on every video I'm wearing a wig.
But why do I use them? Well I think its the most easiest way to change your look every single day.
My own hair is really short and pink and I love of course love it but sometimes I want to try wearing maybe long hair or different colors.
And for that wigs are super easy option!
At the moment I own about ten wigs and actually this lilac is my new one.
This wig is from ElfWigs and on this video I'll be reviewing it.
This is also my first lilac wig. Usually I only one pink, black, white or red ones, but I really wanted to try something new!
Also this is my first long wig since all my other wigs seems to be really short. Or like this long..
I'm actually positively surprised that this wig doesn't get easily tangled.
You know when usually long wigs get tangled so easily and its so hard to use them
but somehow this one is still really silky.
As you can see this is lacefront wig since its doesn't have any bangs
And to be honest I'm still trying to get used to wear these because last years I've been only using short cosplay wigs
I think lacefront wig makes me look more mature and wigs with bangs gives more cute effect.
Lacefront wigs are usually more expensive than cosplay wigs and I think this one was about 90$
I think lacefront wigs are much easier to style than short wigs, since you have to trim the bangs and style it...
and with lacefront wig you only have to cut the extra lace off and style it like you want.
Let me know on comments what kind of hair you would like to have!
If I could choose I'd want pink visual kei hair with maybe some black stripes. But to be honest I'm too lazy to grow my hair again.
Everytime I try it I just end up giving up and cutting them again.
And that's why I think that wigs are best option for me.
You don't have to grow or cut you hair to try something new and you don't have to start bleaching
Also if you want to try new hair color, you don't havev to start bleaching and killing your hair.
So in the end the wig is much easier way to change your look.
Thank you for watching this video and hopefully we see again on next video~
-------------------------------------------
Wyze Cam Pan Review | A Robotic PTZ Camera for $29.99 - Duration: 4:59.
If you remember the video I did a few weeks ago featuring WyzeCam 2, then you already
have a jumpstart on today's video which is all about the $30 Wyze Cam Pan.
This is a new camera that's launching today, but thanks to WyzeCam, I've been testing it
for a couple of weeks.
It's important to point out that I've been using a beta version of the app so take what
I experienced and expect things to get even better.
In the box, you'll find one Wyze Cam Pan equipped with a universal mount.
It also ships with a quick start guide, USB cable, and a power adapter.
Installing Pan was breezy and took less than two minutes since I already had the WyzeCam
app in place.
Speaking of WyzeCam, Pan and WyzeCam 2 share a lot of the same features but they aren't
exactly the same.
The biggest difference is that Pan can pan and tilt mechanically and robotically.
It's also bigger.
At night Pan uses 6 Infrared LEDs as compared to WyzeCam 2 which uses 4.
Can you tell the difference?
During the day, Pan offers a full HD 1080p video resolution using a 120-degree field
of view.
Of course, when you use its Pan and Tilt abilities, your field of view expands.
Though Pan is a PTZ camera, zoom is achieved digitally.
Pan and Tilt, however, are not.
There are three features tied into Pan's PTZ ability starting with control using the app.
For example, you can press right to pan right and up to tilt up or you can use your finger
to swipe the feed and move the camera around.
You can even customize Pan's pan speed.
At its fastest, it can pan 110° per second which means that it can provide a 360° view
in about 3 seconds.
While this is handy, automating the process is more fun.
And the first way you can automate the process is by creating a Pan Scan.
Think of Pan Scan as preset locations for your camera.
When you turn Pan Scan on, the camera will rotate between your four preset locations
spending 10 seconds on one location before moving on to the next.
This allows the camera to monitor a wider area and provide better security coverage.
The final way you can automate the pan tilt process is by enabling Motion Tracking.
Motion Tracking allows the camera to robotically track motion that's within its field of view.
This works when you have the camera set to a locked location and also when you're
using a Pan Scan.
I first tested the camera in an area where it had to monitor a full 360 degrees.
It was easy to trick the camera and hide from its view.
I found that the camera performed better when I didn't walk behind it as its motion sensors
are located on the front of the camera.
If I stayed in front of the camera, it did a much better job of keeping up, even if I
moved quickly.
Two final issues with motion tracking.
One, I noticed that when the camera follows motion, it tends to lose focus becoming slightly
pixelated.
This could be due in part to its lower frame rate.
Like WyzeCam 2, Pan records at 15 frames per second.
Two, panning is not a silent process.
As the camera moves, it makes a motorized sound which is audible in the room and on
recordings.
Going back to the basics, Pan shares most of its features and shortcomings with WyzeCam
2, and as we just went over those not too long ago, I'm going to go through them quickly
but not deeply.
Pan offers two-way audio, a motion detection zone, motion tagging, sound detection, sound
recognition, local storage, and 14 days of free cloud storage.
If you add an SD card, it can record continuously and offers a time-lapse creation feature.
One thing I learned this time around is how the WyzeCam app behaves when you have multiple
cameras.
First of all, you can only stream one camera at a time.
Second, both cameras will record event-based activity to the same library, but you can
filter clips by camera.
Event-based clips are 12 seconds in length and can be downloaded, shared, or deleted
from the mobile app.
Third, push notifications are one size fits all.
While you can control motion detection on a camera by camera basis, turning push notifications
on or off will affect all of your WyzeCam cameras.
To wrap this up, the fact that WyzeCam turned out a product like this for $29.99 is bananas
but so is their $20 WyzeCam 2.
If you're trying to choose between the two, I vote for WyzeCam 2 but only because I prefer
its smaller, more discreet design, and I found Pan's panning noise a little distracting.
If you are strictly considering Wyze Cam Pan, then my vote is yes.
Buy it.
So long as you can deal the shortcomings I've outlined in this video and the ones it shares
with WyzeCam 2 which I pasted into the description below.
But I'll also add this, WyzeCam continues to make these cameras better.
They've pushed out so many wonderful updates over the past few weeks, and I have no doubt
that both Pan and WyzeCam 2 will improve with time.
So with that in mind, I think it's a pretty safe choice considering that it's only $30.
If y'all have any questions about pan, let me know in the comment section below, and
I will see y'all soon!
-------------------------------------------
Volkswagen Polo GTI 2018 NEW FULL Review Interior Exterior Infotainment - Duration: 10:18.
-------------------------------------------
'BIG' WWE Star RETURNS From Injury! | WWE SmackDown Live, May 29 2018 Review - Duration: 5:25.
Samoa Joe is going to Money in the Bank!
Lana and Naomi had a dance off!
And a big WWE star returns from injury!
Literally 'big' because it's Big Cass… and he only really missed a week to be honest,
I struggled to come up with a good title for this video.
Because I'm not even supposed to be here today.
Luke always reviews SmackDown and I'm filling in for him again because apparently he's
got to check on someone he's got captive.
What could that mean?
I'm Oli Davis, click the 'i' above my head to vote for what you thought of the show
- where you can choose from SmackDamn, SmackTastic, Smack Bang in the Middle, Ellsworthy and The
B Team BBQ - as I review the 29th May, 2018 edition of SmackDown Live ...in about 4 minutes.
Big Cass Returns.
Yay.
Samoa Joe opened SmackDown with a Kane-like promo, including phrases like 'salvation'
and 'campaign of fear'.
The difference between Joe's delivery to Kane's, though, is that when Joe says stuff
like this, it's legitimately terrifying.
But bringing up Brie Bella and Birdie was too much, and Daniel Bryan came out to break
Joe's leg.
Speaking of broken legs!
An injured Big Cass then appeared to reveal we won't be getting the much-anticipated
Joe vs Bryan main event, because Paige has said Cass will be facing Joe instead once
he's cleared.
Which is right now.
A scuffle ensued, with Cass standing tall with the briefcase.
As much as I was looking forward to Joe vs Bryan - and I really, really was - this is
smart long term booking.
Joe vs Bryan is a big time match, and deserves more of a feud and story around it.
Paige later revealed it would be a triple threat between all three men to get the last
Money in the Bank match place.
Shinsuke Nakamura beat Tye Dillinger How do you build up a Last Man Standing match?
Fight someone who's whole gimmick is counting the number 10.
Which means…
Tye Dillinger's still employed everyone!
This was a very effective filler match to build to AJ Styles vs Shinsuke Nakamura in
three weeks' time, with Nakamura pinning Tye after a Kinshasa, and then knocking him
out after the match for the ten count.
It would've been significantly more effective, though, if Nakamura won the actual match that
way instead of a simple pin.
AJ Styles put over Shinsuke's striking game to Generic WWE Interviewer No. 3 afterwards,
and then said something about Nakamura about underestimating hi-I wasn't really paying
attention.
I couldn't stop looking at AJ's hair.
Lana vs Naomi (Dance Off) Now that Lana's in the Money in the Bank
match, how do you get around her not being a very good wrestler?
Dance offs, of course!
Rusev and Aiden English accompanied Lana down to the ring, so The Usos joined Naomi because
they're not doing anything else right now.
Lana busted out a half spinarooni and some robot based offence, while Naomi did this
thing with her butt.
They then both danced together and hugged - which was horrible for a moment - until
Lana gave Naomi a neckbreaker and started a brawl!
This wasn't terrible.
New Day beat Miz & The Bar Possibly the best thing on the episode, though,
was the very fun and frantic New Day vs Miz and Bar six man tag.
Xavier Woods leaping over the top rope by using Sheamus as a step, Kofi jumping off
the ring post to the outside!
It was a great match, which Big E won with a Big Ending on Miz - possibly hinting that
he'll be getting the New Day's Money in the Bank place, especially with his singles
victory over The Miz last week.
Karl Anderson Has Abs In a new addition to his character, Karl Anderson
now talks about his abs.
Just when the Good Brothers were about to call their Money in the Bank opponents 'Nerds',
though, the Bludgeon Brothers appeared on a nearby TV screen to threaten about liquefying
bodies.
Asuka beat Mandy Rose Before Asuka's match with The Stunning Mandy
Rose, the Best Friend And Room Mate Of the Stunning Mandy Rose Sonya Deville attacked
her on the ramp.
This allowed The Stunning Mandy Rose to somewhat believably get the upper hand, before eventually
tapping to the Asuka lock.
Charlotte and Becky Lynch bantered about Money in the Bank backstage, so Paige booked a match
for them next week.
Andrade 'Cien' Almas Has No Time For Luchadors Stand down, Rey Mysterio-led Latino faction
in WWE.
When Sin Cara tried to embrace Andrade 'Cien' Almas backstage for also being Latino, Zelina
Vega told him to get lost.
Samoa Joe beat Daniel Bryan & Big Cass The main event was a really good, fast-paced
triple threat, with each man getting their chance to shine.
As ever, though, Bryan was once again the standout - never content with playing the
beaten down babyface Roman Reigns-style, he was constantly fighting both men].
It's a fascinating dynamic considering his smaller size to Roman.
Despite appearing to be the underdog, Bryan is mostly booked to take at least half the
match.
Roman, however, gets beaten for 80% of the match, despite being physically larger, and
just snatches at the end.
Having the match won against Big Cass, Bryan was then caught from behind in Joe's Coquina
Clutch and passed out.
Which is a noble way to lose, but it does beg the question…
why didn't Reigns lose his Backlash match against Joe when he visibly passed out in
the hold?
Cass beat up Bryan afterwards with the Big Boot.
Yay, that feud is continuing.
This was a very watchable episode, with all the feuds being furthered and two really good
matches.
This week's SmackDown is SmackTastic.
Enzo Amore has returned to the public eye with a shocking music video!
Click the video onscreen now to find out more details.
And give us a subscribe to keep up to date with all the latest backstage wrestling news!
I've been Oli Davis, and that was wrestling.
-------------------------------------------
CAR REVIEWS - MAZDA RX-8 - Duration: 7:15.
so, CamSaw from what I know is
you are a frequent driver when it comes to Sepang Circuit
you compete in Time Attack events in Sepang Circuit
and you have won there as well
I also know that you have driven cars with different layout like
Front wheel drive, Rear wheel drive and Mid-engine Rear wheel drive
just curious, why would you choose a RX-8?
basically after the birth of my son I needed a four-door, four-seater car
so I have a few choices like
Altezza, E46 330i, and RX-8
and finally I choose the RX-8
because of the styling, high revving engine, 6 speed manual and also a reasonable price
before you bought this car did you ever consider
because its a rotary powered car it will give you some reliability issues?
buy first and think about that later
not wrong, for this car before you buy you must first see the engine condition
did the previous owner take good care of the car
all of this factor
for my case the previous owner is a careful owner so I'm not worried about anything
how long have you been driving this car?
a year
what's the different driving this RX-8 compare to some of the other cars
for this car
high rev is awesome
the ration of it's 6-speed transmission is good as well
stock suspension is a bit to the soft side
but if you use it to fetch your kids, get grocery or just cruise around it's totally fine
it can race and it can fetch my kid
a bit of maintenance issues at times can't e avoided
Không có nhận xét nào:
Đăng nhận xét