Ghostbusters Select
Taxi Driver Zombie Diamond Select Action Figure Review - Ghostbusters: Series
5: Select Action Figure: Taxi Driver Zombie.
Anybody seen any ghosts?
The hit toy line based on the horror-comedy classic movie Ghostbusters is back with a
fifth series of action figures, and this series is spectrally delicious!
Series 5 unleashes three spirits from the original 1984 movie: the Library Ghost, the
Taxi Driver Zombie and a Terror Dog!
Each 7-inch scale figure features up to 16 points of articulation, as well as character-specific
accessories: the Library Ghost comes with a stack of books, the Taxi Driver comes with
a steering wheel and the Terror Dog comes with interchangeable horns so it can be either
Zuul or Vinz Clortho!
Plus, each figure comes with a piece of the rooftop diorama - these are the last three
figures you need to complete the whole shebang!
Packaged in the trademark Select display packaging, with side panel artwork for shelf reference.
Thank you for watching guys if you enjoyed this video please give it a thumbs up and
smash the subscribe button it would really help us out and stay tuned for more geeky
adventures.
Please Subscribe and Support the channel!! https://www.youtube.com/channel/UC23U4jpP2BAw8uxaH4Zwh8g?sub_confirmation=1
Socials - Instagram: https://www.instagram.com/supersorrell
- Twitter: https://twitter.com/supersorrell - Facebook Page: https://www.facebook.com/supersorrell
- Website: http://www.supersorrell.co.uk
About The Channel: Toy Reviews - every single day! - Disney Toys,
Marvel, DC Comics, Star Wars, Horror Toys and much much more in this family friendly
toy review channel.
We review toy lines like Marvel Legends, DC Collectibles, Star Wars Black Series, Disney
Store ToyBox figures, Tsum Tsums, Funko Pop Vinyls and NECA Toys.
Join us in our Vlogs as we go Toy Hunting around the UK each week bringing you the latest
toy news and whats on the shelf! we hit big name stores like smyths toys, disney store
and even budget chains like B&M and Home Bargains!
We also review Basic figure lines such as the Marvel Basic Movie lines, Batman Missions
and the Star Wars 3.75 inch line.
We are excited for new toys to review from Mary Poppins Returns, Wrek It Ralph Breaks
The Internet and more!! as along as movies keep churning out toys, we will keep reviewing
them so join our TOY EMPIRE by smashing the SUBSCRIBE button and joining us each and every
day for some PLASTIC SIZED FUN!! have an awesome day!! and see you soon!
Let me know your thoughts in the comments below;
#Ghostbusters #Halloween #actionfigures #Halloween2018 #diamondselect #toys #unboxing #review
Ghostbusters Select Taxi Driver Zombie Diamond Select Action Figure Review
ghostbusters,ghostbusters select,ghostbusters select series 5,ghostbusters select taxi driver
zombie,taxi driver zombie,zombie,zombie taxi driver,zombie taxi driver ghostbusters,diamond
select,ghostbusters action figures,ghostbusters action figures review,ghostbusters action
figures diamond select,ghostbusters diamond select figures,diamond select toys,diamond
select,action figure,diamond select ghostbusters,ghostbusters action figures 2018,supersorrell,unboxing
For more infomation >> Ghostbusters Select Taxi Driver Zombie Diamond Select Action Figure Review - Duration: 10:03.-------------------------------------------
✅ Razer Naga Trinity Gaming Mouse Review - Duration: 5:19.
-------------------------------------------
Best phone tripod? Joby GorillaPod Mobile Rig review - Best iPhone tripod? - Duration: 4:02.
today I'm going to review the Gorillapod mobile rig and see if it really is the
best tripod rig for your smartphone stay tuned hi I'm Sara Nguyen and on this
channel I make tech and social media easier for awesome entrepreneurs like
yourself if you're new to this channel consider subscribing for all of the
latest product views social media marketing tips and training and at
anytime during this video check out the description for links to all of the
resources mentioned in this video the Gorillapod Mobile rig is a tripod made
by Joby the base of the mobile rig is Joby's famous bendy flexible tripod you
can bend the legs to get a better grip for when you're vlogging or
live-streaming on Facebook or Instagram you can wrap the legs around an edge a
pole or a branch to get different angles and different perspectives and of course
you can place the rig on a desk to get stable video when you're live streaming
or shooting video footage but the top part of the gorilla pod mobile rig is
where the party is really at on the top of the mobile read you get a phone mount
which allows you to attach your phone it locks in quite securely and you can also
use the phone mount to tilt your phone vertical or landscape you can also tilt
your phone up and down like that as well this is particularly useful if you're
shooting footage where you're drawing or you're doing a demonstration of the
product with your hands the top of the foam mount also has a cold shoe mount so
you can attach accessories such as a microphone
or alight and you also get to arms on the Joby Gorillapod
rig allowing you to have three accessory attachments altogether so I could add a
light I could add a microphone and with the third arm I could also add another
device allowing me to livestream at the same time on two different platforms if
I so choose the base of the joy be gorillapod mubarak also detaches so you
can take the top part of the rig and attach it to a tripod if you wanted to
have this setup and a tripod with more highs all in all the Gorillapod Mobile rig
really is a quality tripod it's been designed for creators it's flexible it's
portable and it's easy to use that allows you to securely mount your
smartphone your lights and your microphone all in one place if you found
this video useful give me a thumbs up and don't forget to subscribe to my
channel and if you're looking for more ways to grow your business with live
streaming having an amazing vendee tripod is just one part of the equation
you need to figure out what topics to talk about what to say
how to go live and what other equipment you need I've put together a facebook
lives cheat sheet it's a super simple guide to get you up and streaming on
Facebook live even if you've never live streamed before to get your hands on it
simply click on the link in the description below and thanks for
watching
-------------------------------------------
2019 Toyota Fortuner TEST DRIVE !!! | Lobud Review - Duration: 2:23.
2019 Toyota Fortuner TEST DRIVE !!! | Lobud Review
-------------------------------------------
Review Sony NP-BX1 External Battery Charger for Sony FDR X-3000 Action Camera | Broewnis Photo - Duration: 4:00.
Hello Everyone. Welcome to Broewnis Photo
As you can see here in my hand this is a External Charger for Sony Battery NP-BX1
I using this battery for my Sony Action Cam Sony FDR X-3000 using NP-BX1 Battery type.
So, if you have Sony camera that using this battery
also can be use also with this camera.
Now more focus to this charger
So this is very cheap External Charger for NP-BX1,
I have two batteries, it will charger at the same time
So, this is SEIWEI external charger from China Manufacture
There's a many brand name using the same adapter type only different the brand name.
This is a LCD monitor to showing you the current charger level
So when it full it will show full bar and when not in full will showing a couple bar
That means the battery still in charging
So this is the battery slot, the first slot and the second slot
The first slot will show status charge on the left side, the second slot will show status charge on the right side.
This is on the left side and the bottom side.
This is right side and on the top side you will find the micro usb port here
This is not a Type-C port, this is Micro USB for charging
And on the back side we can see the details of External Charger
This is the input and output number as you can see here and other logo to make it more seriuosly external charger.
This camera doesn't provide External Charger so you need to charge directly inside the camera.
But if you have two battery and if you don't have this external charger it will pain waiting first battery full and doing for second charging
And I will demonstrate when doing charging
I also prepare the charging cable right now
Ok let's begin, 3, 2, 1
You can see very bright light here with the blue light showing the charging is begin
On the left side is for the First Slot and on the right side for the Second Slot.
You need to waiting until the battery full charging
The two batteries indicate that the two battery is in full charging because I already charge in full before this video
You can prevent overcharging because this is will help you a lot to get notified when the battery is full.
This external charger I buy for $7 not include the battery
If you want to buy the external charger with two batteries it's about $15
that's a very good price for the charger and also with two batteries as spare battery for your camera
So I put the link in the description you can check it out
This a travel charger very lightweight, not very heavy, so you can store in your pocket or in your bag when you traveling
And also you can charging with your power bank easily
So when you're not in the hotel or in the lodging,
You can charging the battery with the charger and the power from your power bank.
Ok, that's it from the Broewnis Photo, don't forget to SUBSCRIBE, if you have any question drop your comment below
See you in the next video.
-------------------------------------------
Ka-Bar Becker Combat Bowie BK9 & BK10 Crewman Review. Hard Use, Field Testing, Batoning, the usual - Duration: 14:15.
Today we're checking off the Becker box.
A subscriber sent me an electronic mail, and said I'd like to donate some knives what
would you like?
So either he likes this sort of Youtube bullshit or because eventually I'm gonna lose a limb,
and he wants to be the one who enabled it.
That'll teach him to say mean things about Swiss Army Knives (laughs).
Both are good reasons… and since people have been asking for Beckers I said any Becker
will do.
But then because I'm an idiot I also bought another Becker.
So up on the literal chopping stump we're treated to some tactical bushcraft whatever
from the Ka-Bar Manufactured Becker Prybar line, the BK-9 and BK-10.
The BK-10 being a small big ass chopping knife, and the Bk-9 a standard big ass chopping knife.
Both denoted by their sick ass murdered out appearance, and same sized handles, but different
blade sizes.
Not pictured in this video, but also in their current line up would be the BK-7 a 7 inch
version of the BK-9, and the BK-2 a similar size to the BK-10, but with a slightly different
blade shape, for those who baton.
There's also a few kukris, machetes, and smaller knives in the Becker line too- so collect
all of those.
But before we get into that, in a loud chorus let's all say it together let's look at the
dimensions like the overall lengths and weights.
With and without the sheath.
Ok you shouldn't use a knife for prying.
I feel like I should state the obvious this time, because someone said I shouldn't have
hit my axe with the oversize bushcraft mallet on my last video.
Blade size and cutting edge.
Prying as you know is a job best left for a $100 Instagram/Kickstarter/Massdrop titanium
prybar bottle opener thingy.
Handle Size and grip area.
It'll go well with your $150 Rexford R.U.T. and all of your other terrible life choices.
Spine and Handle thickness behind the edge.
They don't know it now, but robot anthropologists one day will use damascus razor blades, as
the indicator of where it all went wrong.
Tallnesses.
The influencers, and portrait mode were ultimately responsible.
The influencers will shoulder a lot of the blame for trying to sell a planet full of
dumbasses tons of useless artisan bullshit.
They'd rather buy a pry bar than food for their family.
"Hey bro long time fan of the channel, I would like to know if you're interested in reviewing
my kickstarter neck knife.
It's the first fixed blade with a virtual diamond ceramic detent, and bluetooth.
Starts at 700 for the base model.
I'm down to jokes now that only people with Youtube channels get.
So the Becker BK-9 and BK-10 as the sorts of people who watch knife videos know is part
of the collaboration between Becker Tool and Knife and Ka-Bar.
Ka-Bar makes the damn knives for Monsieur Becker, and I have little interest in researching
when that collaboration happened- after 20 minutes of looking at flame fucking anodized
deep carry pocket pry bars.
Just know that at some point it happened and I don't really care when.
The steel used on these is that Ka-Bar special 1095 Cro-Van carbon steel, found in their
whole line of fighting knives used in approximately 3-5 actual fights a year, after both guys
forgot their guns.
This here's my fighting knife- cool ever fought anyone with it?
If you remember my Ka-Bar Dogs Head video art review about a month ago you might remember
that knives blade has more of a slick black coating.
This one is more like found on your spray on truck liner bed.
Thick texture, not slick, kind of like an Esee's but with a just slightly rougher
grain.
Both are flat ground knives, with 20 degree per side edge grind, which should match up
to Spydercos sharp maker 40 degree setting well.
Both gots a clip point with an unsharpened swedge on the tip…
Which in theory could chew up you baton.
Remember the Campanion BK-2 is a standard drop point slightly better for batoning on
the job site.
BK-7 though also has that bowie clip point fight knife tactical blade style.
The handle is that plastic Zytel on some product pages, then it's called Ultramid on the official
website, as to not sound so poor and plastic-y.
To us standard idiots it's a high impact plastic that's kind of smooth and very durable.
The handle is nice and meaty with a generous grip area- a reason why these knives are popular
with assholes with Youtube channels and who post on knife forums.
You can buy some $40 half-the-price-of-the knives-after market micarta handles, which
I of course did.
I learned from the knife nuts podcast that tooling is the biggest reason for high prices,
on what seem like simple objects.
And the $40 ones you can buy on Amazon are the cheapest.
If you have problems with money you can find some G10 scales on the knife connection for
$60.
As you can see the knives naked have weight saving holes drilled in the handle area, and
the zytel handles are semi hollow.
The fabric bandage colored micarta scales are solid.
As I foreshadowed earlier the scales are swappable on most of the full size beckers because they
all have the same handle scale size and grip area.
Like these two.
Here are the models these scales are compatible with, I will link them in the description.
You also have some spine jimping.
It's that thick texture for hard use situations.
I will commend Becker for keeping that sort of jimping just on the thumb ramp, because
I know it's temping as shit to put that all around the handles for all sorts of tactical
grips.
I like fine spyderco jimping or thumbs ramps without imping a little better in case you
weren't wondering.
The center of balance is about near the middle of the front quillion on the BK-10 and the
weight is all in the business and of the BK-9.
The sheath.
Becker sheaths rarely get raves, except from the accountants at Becker.
If you own a Schrade SCHF pryer series knife, and know what those sheaths look like then
this is one of those.
I mean not exactly, but similar construction.
You even get the pouch for your sharpening stone or weed.
The two snaps up top secure the BK-10 however they aren't super easy to snap, and have
to be situated precisely to get both to snap over the handles.
The BK-9 has just one snap, which means it's still kind of hard to snap, but 50% less because
there's only one.
The sheaths are Molle compatible, have some velcro and loops butt of handle rides just
at the belt line which is acceptable.
Ok comparisons.
Or I were reviewing the BK-2 we'd call it camp-parisons oh I'm so funny.
First the BK-10.
As far as American Made Pry Bar knives go the Beckers are some of the most popular styles
because you can find most of them well under $100.
This one is about $70 on Amazon.
Think Esee's but with shittier warranties and sheaths.
That's why they're cheaper.
Lot's of after market handles, sheaths, tactical accessories, and scales so you can
pay more than an Esee though.
Now my Laser Strike.
Until one day I get a regular Esee 6 which are about $110-$140, this is my favorite and
about $100.
To be honest if you gave the Becker Micarta Scales, and a better sheath both are very
similar other than cutting edges.
If you often screw around with starting fires, ferro rods, building shelters, chopping, getting
footage for your Youtube baton porn channel- these are the sorts of knives good for that.
If you're hunting, maybe look at something lighter and smaller, and also don't forget
your gun.
Now the Ka-Bar Dogs Head Utility at $65.
Batoning and building shelters is not this knives strong suit… but looking military
as shit is though.
I'm not sure what you'd do with a 7 inch blade outside other than batoning and murdering
teenagers on halloween- but I'm sure you have your reasons.
The differential heat treat on the rat tail tang means it could bend during especially
vigorous baton sessions like it did with me.
Bending is better than breaking though.
Let's see how about my Schrade SCHF52 big and about $40.
Don't mind the duck tape and dings in the top of the blade.
This was a loaner knife- and if you're watching this video you know who you are and I won't
publicly shame you.
A less drag blade coating, made in china, kinda cheap but functional sheath.
Good for batoning.
Not that Becker designer name though.
How about a Buck 119 about $50 and made in the USA.
This knife is a little lighter, has a more pronounced clip, the smaller version of the
one that murdered people in the Scream movie and probably better at food and corpse prep
overall than the Becker.
If I'm stabbing people in a horror movie about horror movies, the glint of an uncoated
blade would be slightly more frightening.
Now a the BK-9.
It's the biggest becker knife, on a technicality.
The bigger beckers are kukris or machetes and broad swords.
It's often compared to the Esee Junglas and Junglas II.
The Junglas bigger, the junglas 2 is smaller.
I don't own the Junglas I but the Junglas II has a different center of gravity and feels
heavier in the hand, because of the larger handle and the handle isn't skeletonized.
I think all handles on fixed blades should be skeltonized.
Now the Skrama, this knife has a very similar blade cutting edge, and feels lighter in the
hand.
The Skrama is a good chopper with a larger comfortable handle.
Comes with a nice dangler sheath, and costs about $100 shipped to USA, maybe a bit less
for the Carbon steel flavor.
Now the Carothers HD 10" chopper.
I plan on reviewing this one soon.
This is heavier, heavier in a good way, as in in the blade area.
With a high end steel.
It's a $500, so it's not even something I could afford, even with that massive tax cut
my employer got this year.
It's on loan from a subscriber, who out of the blue asked if I wanted to review it.
I can't say if an $500 chopper is worth it, but if a knife were to be worth that much,
then maybe this one.
This is the best at chopping.
Out of all of the non axes seen in this video.
Get out your batons fellows.
Ok maybe I really do like my Zombie Tools Vakra.
One of these days I'm gonna buy a nice authentic kukri, I mean I have a cheap one, but I'd
like another.
Until then, my Zombie tools is my best largest chopper.
Are we done?
We're getting close right?
Axes are for smart people, big ass knives are for people more like myself.
Sometimes a dude needs to split and chop wood with a knife.
Bk-10 is better as a standard knife, with just a little wood play thrown in.
The BK-9 works better for full on bushcraft Larping.
Thicker than a machete blade stock, so you can just go out and whack things.
I prefer whacking Kukris…
However Kukris are not as good for batoning.
So you chop wood with a Kukri, you bring your BK-9 along for batoning.
You bring your machete along for clearing brush.
You bring your BK-10 along to look cool, then use your Spyderco Para Military for the real
knife stuff.
If I had to give one up I'd give up the BK-10, because I have lighter slightly smaller knives
I can get the same done with.
I slightly prefer Esees to Becker because of the better unconditional warranty and the
nicer standard options.
However that Skeletonized handle gives the beckers an edge over similar sized esees,
in lightness in the palm- Plus they are a bit cheaper.
A blade should never break but sometimes they do.
The more you whack on them or pry with them, then the more likely it is.
If you plan on battening 3 inch or less logs then maybe go with the BK-2 instead of the
BK-10, just to further confuse you.
I think I prefer the BK-9 to my Junglas 2 slightly, though I'll have to wait a little
longer to know for sure.
The handle with the micarta scales has a bit better palm swell, and feels a bit less loose
in the hand than the Junglas II.
And remember children knives with a slight drop point are best for log whacking.
If you like this sort of review, subscribe to the channel, donate to my Patreon- give
the video a thumbs up.
Thanks for watching!
-------------------------------------------
지코를 먹어봤다. (코코넛워터 지코 리뷰, COCONUT WATER ZICO REVIEW) - Duration: 2:26.
-------------------------------------------
PomadeShop-Review: Hey Joe Black Deluxe (mit Andy) – english subtitles – - Duration: 8:57.
Hello guys, this is Andy out of the PomadeShop headquarter again,
here in Ottobrunn in our lovely showroom.
And you know when I'm here
it's about another waterbased pomade.
I'll do my second review on a Spanish Hey Joe pomade today:
This time it's the Hey Joe Black Deluxe.
It's the newest pomade of this Spanish company from Valencia.
It was highly requested by you
also by one of our biggest fans Daniel.
Greetings to you, Daniel,
we hope you will like this video –
all of you we hope.
This one actually is a really crazy new pomade.
It's one I had in fact to train its application at home first
until I found out how to use it with my thin hair.
Because what's special about this pomade:
It colors your hair black.
But you don't get totally black hair from it, it just makes it clearly darker.
You can see that on the inside.
It's a classic gel-type pomade
and I hope you can see it properly
it's really pitch black.
That comes from a combination of different colorings
which enable that really strong pitch black color.
I would say it's a pomade
you shouldn't necessarily use when you have light blonde or white hair.
I just can image that this might look a bit strange.
But I appeal for that: You are blonde and want to try it?
Do that and please send pictures of the result –
that would be cool.
Here in our team we don't have a guy with light colored hair to try it out ourselves.
But like I said I had to train the application of this pomade before
because – you know my thin hair, especially in the front –
if you take too much you just paint your scalp black
and that looks stupid of course.
But I will show you how I use it now
and what's the result then.
It is a strong hold pomade
so it gives a very firm hold which lasts all day long.
And it hardens pretty fast.
That's why I won't use it in dry hair but in damp hair.
The pomade smells a bit like cola
so I chose the Eau De Portugal Hair Tonic today
which has a nice citric scent
and that should fit nicely I think.
That's not enough, I need a bit more.
Work into the hair properly
to damp it a bit so it's easier to apply the pomade.
Let's check that the hair already looks quite nice.
And now: The first time I used it
I took a way too big amount on my finger
– like many might do it because of the excitement.
This is in fact a product which should be
used extremely economical.
This amount is totally enough.
Of course you can take more if you need to –
Flo would laugh at me with such a small amount.
I can reveal: He is sitting behind the camera right now
and is shaking his head unbelievingly.
But it works. Now look at this.
You spread it between your palms …
and …
you're a member of the black hand secret society.
That's really totally crazy.
But don't worry,
you can clean that easily just with pure water
without any problems.
Now you can see how a pomade, which is normally transparent,
spreads all over your hands.
And then start really slowly.
First I go up and down at my part
to define it.
And …
then I work it in.
I can already see in the mirror that my hair is getting darker
I hope you can also see that in the video.
This spot in the front –
where my hair is very thin and slightly little
I have to pay attention not to
press my hand straight on there
because then my scalp would be covered with black color
and I would have to wash it out completely
because cleaning between the hair with a Q-tip would be silly of course.
It's applied quite properly now,
you see my hands are still pretty black
let's check if I can get rid of that …
Not totally but for that I have our
popular PomadeShop towel.
And that's enough.
And now, I always say it:
You can style your hair how you like to.
Here's the proof
that this is a really strong pomade
which gives a very great hold.
Just style it
how you like it.
It behaves – although its color is so extreme –
exactly like every other waterbased pomade.
It hardens pretty fast
but you still have enough time
to work on your styling.
I spare you watching me combing for another 4 minutes now.
I think you can see
that if the hair is quite litte like here in my front
and it's clearly darker now
it looks a bit like thicker hair, like more hair –
at least I imagine.
Because of that I have to say
although I had some trouble with this product first
it definitely has the right to exist.
The effect of coloring the hair is clearly visible
I hope you can also see it.
Flo is nodding, yes.
Concerning the purpose this product is for, this is really awesome stuff.
I just don't know if it's a product for everyone of you.
And I know it's waterbased and so on
but for those who like waterbased pomades
this is a nice alternative if you have little hair,
or if you have some grey hair
or if you really want to see how it looks
when you use such black stuff
on your light blonde hair.
It's worth a try.
Its scent is a pleasant cola scent,
not too sweet, a bit bitter which I like.
You see I didn't take much
it's really efficient stuff.
There's one streak standing away – don't pay attention to that.
Honestly it's a very cool thing
to have such a coloring pomade.
The design as usual with this crocodile or alligator
also looks quite nice.
I can definitely recommend to try it.
If you like waterbased, this stuff does a nice job
and you maybe want to have a bit darker hair from time to time.
I can clearly recommend it.
We have it on stock of course,
you can also ask your barber for it.
If you have further questions just leave a comment
or you contact us via Facebook, via email or phone us
we are also there for you.
If you liked this video
I'm happy about every thumb up
and I'm even happier about a subscription to our channel.
We get more and more subscribers
thank you guys very much, we are very happy about that!
As always leave a comment abut what you want us to review in the future
it's a pleasure for us.
That's it guys. This is Andy from PomadeShop, take care, bye bye.
One small addition:
I just recognized I talked about the hold,
the scent
but I didn't mention the shine of this pomade.
And that's a really nice thing:
You might see it, because of the hair being darker now
you get a great shine
which doesn't look greasy but very very nice.
If you like shine, if you like dark hair
this is a really great pomade.
I hope I didn't forget anything else.
See you next time, bye bye.
-------------------------------------------
LULUTRESS ISLAND TWIST CROCHET BRAIDS REVIEW| VERY NATURAL!!!| LIA LAVON - Duration: 20:26.
Hey YouTube family. It's ya girl Lia back again with another video.
And today's video as you can see from the title is just another crochet hair review
video. And today's crochet hair as you also saw in the title is the Lulutress
Island Twist hair 18 inches and I have it in two different colors. I have in the
color 4 and I have it in the color 30. Now if you're not familiar with my
crochet hair review series I take my time with these hairs. This is not just
a first impressions I installed the hair I love it and I haven't tested it
out. Oh no no no I come on here and I show you my first day thoughts of
a crochet hair. Showing you how it looks the very first day that I install
it. How long it took? How long the hair actually is when you first install it?
Did I split it? How many knots I had to do with the hair and overall my first day
thoughts with the hair. Then I come on here with my first week thoughts on the
hair showing you how the hair looks in one week. Did it go south in a week? Is
there any issues that I'm seeing with the hair in one week? Did I have to
mousse it? What I had to do in terms of nighttime routine and all of that. Then I
come on here with my final week's thoughts of the hair. No matter how long I
wear it. Whether it's four weeks, five weeks, six weeks. However long I'm able to get a
wear out of the hair I show you how it looks on that very last day. Meaning the
day I'm going to take the hair out. I show you how it looks on the last day.
I also tell you what my overall thoughts are on the hair. Whether I recommend the
hair. Whether I think you should purchase it. Whether I think it's water friendly.
Activewear friendly. Whether it's high maintenance. Low maintenance. I just bring you all
the true tea on these hairs. Now if that's something that excites you just keep
watching to see my first day thoughts on this Lulutres Island twist hair. A
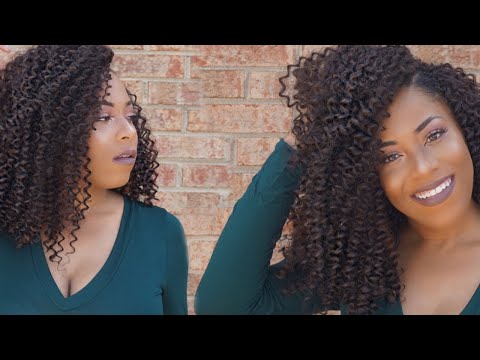
few moments later. So now coming on here for my first day thoughts on this Lulutress
Island twist hair. Now this is what it looks like very first day. Like I said
in the intro I have the color 4 as well as the color 30 installed. So this is kind
of what it looks like. 4 kind of that natural four-ish color. 30 is very bright.
Didn't realize it was gonna be that bright I might have not installed it but
we'll get into that in a quick second. But this is what it looks like. It was 18
inches as I said I cut a little bit of it for evenness but overall this is kind
of what it will look like if you freshly install the hair.
Now of course I'm going to cut the hair but I like to come on here on my first day
and show you how it looks so you have an overall idea of what the hair looks like
kind of in its natural state. So I'll do it 360 so you can kind of see how the
hair looks all throughout. Don't mind the back cause it will be some jankyness
going on but I have forewarned you. Now if any of you guys saw my Lulutress
deep wave hair you guys know at the time I bought deep wave I bought four other
oh no three other Lulutress hairs at the same time. I was just on a spree. I
just I was just seeing it it was on sale I got it from GenbeautyNY that's
where I bought this hair from. Where I bought all my Lulutress hairs
from. They were having like a 30% off $30 off sale so I bought three packs of the
island twist in the color 4. I bought 2 packs of it in the color 30. Now I like
the color 4. It's very much so true to life color 4 although it doesn't blend
that well with my roots. And that's a little. It's it's true to life 4. A lot
of 4's that I buy aren't true to life 4's. Sometimes they look more so a
two-ish color and I'm like ok good but this is the true to life 4. Which isn't
a bad thing. I like things to be the way they say they're gonna be. So if you have
a real 4 color this will blend well. If not I think looking back hindsight I
probably would have got this hair in a two just so it blends a little bit
better with my roots. The 30 color is also a very bright 30 color. It's also
true to life 30 ish color. I wish I had put it in a little bit more sporadically
right now it kind of looks like it's in the under part and my front is all that
4. And if you kind of do a little you know you can do a peekaboo and get that
30. Now with the install of this hair probably goes without saying all
straight backs. All straight back braids that's how my braid pattern is in
pretty much 95% of all the installs on my channel. Now this hair looking at the
model on the back I wasn't impressed. When I got this hair in the mail I was
looking at her and it looks very syntheticy. It looks very Barbie doll
Mattel everything about it just look like Uh. And I was trying to pick. I was
really probably gonna have beach curl in my hair if it wasn't for my inner
thoughts being like no see what you can do with this hair. So I never really
watched anybody's reviews tutorials of hairs but I needed to kind of have a
gauge of what to do best with this hair and I looked up Beauty Can Braid. If you
guys aren't familiar her you need to be. She does some amazing
crochet hair installs. She installed this hair. She's the only other person
that I've seen try this hair at this point as I'm reviewing this hair and she
installed this hair and what she did in it she split the hair two times in the
back four times in the front. So meaning this is the hair. This is how it comes
directly out of the pack. This is exactly how it looks. If you guys want to have
idea and of course you can see it looks a little different than it kind of looks
in my hair and that's because I split the hair. So this is what I mean by
splitting it and so you're left with these two strings right here. And so this
is how I install this hair. So as I said Beautycanbraid split the hair one time
in the back two times in the front. So you're left with four pieces in the
front and then two pieces in the back. I only split the hair one time so I had
two separate strands for each. Just because of simple laziness that I did
not split the hair more than I guess she's like she did. With that method you
kind of do use less hair. In the deep wave hair video I use all five packs I
believe of that Lulutress deep wave. And this the two packs that I showed you
that I held up are all that I have left. So I'd say I used about four packs total
because I have half of the 30 left and I have about half of the 4 left. So I
think in total use 4 packs but I say on the safe side probably be good with 5
packs. I did split this hair. So if you installed it yourself and it doesn't
look the same that's because I did go head and split the hair before I
installed it. Also in terms of knotting. Knotting this hair was probably about
three times. Three to four. I think beautycanbraid said she knotted this hair about
four to five times in her video. If you guys want to see her install just again
check it out because she does a beautiful job installing. I just recently
got hip to her channel within like four last four months. I'm just addicted to
how she installs some hair. I'm like dang girl you be braiding some hair. Also
another thing she did in her video she put some mousse through the hair. She put
a lot of mousse. I need to buy the mousse that she was talking about too cuz you
guys tell me you guys like the mousses I try but I like the mousse that she
tried because it was very much so foaming. And she just went ham and so
that's what I did yesterday. I just using boost I'm not even gonna show the
brand of this mess because I don't care about it that much it's just all I had
right now I'm gonna go out to the store today and buy whatever mousse you've had
in that video I can't remember what it is but I'm gonna go back watch that and
buy that mousse because she went ham she said that's good for taming this
hair because it can be very big so last night as soon as I saw this hair
I sprayed this on and kind of break it through and when I say I really went I
just would like just don't go all the way through and raked my hands through
it I think that also works good for you know bringing out some of the hair some
of the hair that didn't get crocheted right or getting get crocheted
incorrectly you can pull on it now I'm not pulling any hair right now because I
did this last night but if you're doing this first install just break your hand
through it and it will pull out some of the hair and also will tame it down so
she said that this is good for taming and so I was like alright girl porn out
listen let's go tame this hair overall last night all I did was pineapple to
hear and witness sleep now it was very heavy but I think it's because it was
all at the top of my head but when I tell you last night it was kind of heavy
but this is a lot of hair and I do plan on cutting it fairly soon so the next
time you guys see me with this hair it will not be at this length but overall
first day thoughts um I think it's giving me what is it giving it is giving
me a you know i'll any kind of a vibe is reminding me very much so of the
sensational island twist now i think about it oh no it was sensational island
curl wait a minute as I'm filming this successional makes
the blue tres brand it's this just island curl in a different you know what
let me not get into it but it does remind me of the island curl hair by
sensational I think Island curl was 12 inches of
course his hair is 18 inches I'm now more so an advocate for shorter hair so
of course this is very much so you can't even get in the full hair and camera
right now it's a lot of hair but I do plan on cutting this hair so next time
you guys see me in my one week's bosses here will be drastically different but
catch that when you guys watch my one week
review coming up right now one week later so now your girl is coming down
here for my first week thoughts on this Lulu tres island twist hair and I'm in
the process right now of editing my Amazon wave velvet wave by main concept
hair video right now and I'm laughing at myself because in my first week and my
first day was raving about it and then it just took that's her and that final
week's thought so I decided going forward I'll probably make my first week
thoughts very short because I've realized the first day and the last day
are pretty much the only days that really really matter the really days
that you want to see the hair and the first week I want to structure it so I
just talked about maintenance you guys let me know down below if that works
well for you if I just keep the first week very short so as to not shoot
myself in the foot and come on here you know weeks later uh-oh I might have been
wrong you guys so I will make this very brief and I will keep my first week
thoughts only to maintenance and how I feel about the Hara in a week and I say
this because I love this hair before I turn on this camera I was going to turn
and say you know I adore this hair to date probably my favorite curly style
you guys know I've tried the ultra kinky curly and the sensational island curl
hair out of those two this hair takes the cake now I'm gonna try to keep my
excitement down because again I could come back three weeks later there'd be a
whole different vibe be a whole different video so I'm gonna keep it
keep it at a minimum keep my excitement at bay but I have to say I have enjoyed
the maintenance on this here because I'm lazy I'm lazy I admit it I'm a minute
I'm lazy only because I'm so busy so the last thing I want to worry about is my
hair and this hair has allowed me to do that it has allowed me to be kind of
hands-off when I say I have literally just pineapple this hair at night so
putting it up at the top of my head put my scarf on I'm waking up in the morning
that's all I did a product has not touched my hair until last night so last
night's Friday night I was moussing this hair while watching TV and separating
because I knew I was gonna wake up this morning and film but and I wanted the
hair to be as detangle as possible but truly didn't I let a product touch this
hair in the last week other than last night and detangling it
was such a breeze it was not a hassle I didn't have like oh my god is so hard
it's so hard to get the hairs to detached no had no issues detangling it
now again everything I say has been within this first week we will see mom
going on colleges next week I'm going to the best I would say HBCU I know I
didn't go to this HBCU but I'm gonna spend the entirety of next week
college recruiting out one of the best HBCUs in this state I won't even say the
name because they're gonna be people debating it in the comments but I am
going there I'll need a hair that can last me all day they don't look good on
campus and I don't look good and be low-maintenance at night when I'm
probably just ready to ko at night then the next week I'm gonna go see some more
campuses so I have a busy couple of weeks and I'm hoping that his hair looks
good through out there but you guys will see how I feel about this hair and my
final week's thoughts coming up all right now lay down so now your girl is
back for my final thoughts on this a Lulu tres island curl hair now it has
been three weeks with this hair and I know I said in a recent video that I was
going to try to do four weeks or more with the majority of my hairs upcoming
but when you've got an itch October is right around the corner and I am ready
to try something new and I feel like three weeks is enough time for me to
kind of bring you guys my overall thoughts I think I know how I feel about
this here and I don't need to wear any longer to kind of have my overall
thoughts on this here let me get up in camera to show you guys how it doesn't
look and three weeks of wear now I had the Goldilocks syndrome with the after a
kinky curly hair that hair was too hard with the sensational Island twist hair
that hair was too soft and they're sensational is the parent company of
Lulu trust so I don't know how they got it right with the Lulu trust but the
island curl is just running it's not too soft it's not too hard it's just perfect
look at the curls like when you have a too soft hair what I've realized was too
soft hairs is that texture doesn't stay the same throughout the wear of the hair
so if it's too soft it starts to frizz a little bit and then it comes to frizzy
to the point of you don't even know what the curl is anymore it's just a ball of
friends the curls are still intact and this is three weeks of wear with is here
such a natural texture now the one thing I would say be the drawback and it's a
drawback on me it's a really fun thing the company didn't do anything wrong in
this department but for me I should have gotten a natural color I should have got
the color of mine here especially because I leave my edges
out you guys know I'm all about edge preservation so I leave my edges out a
lot of times and my edges of course are at the dark I have about a 2-1 be type
of a hair color and this hair is a 4 you may not be able to tell indoors but when
you're outside you definitely can see the brightness of the fort come through
so it kind of looks a mich match and that's the one thing I would say I would
have gotten a two so it just looks super blendable super natural and it just
looks like it's growing out of your hair I look for people's feedback and a lot
of times outside I can't see but people are looking at I'm like it looks a
beautiful curl but you should have got it to match your hair better and then it
would just be phenomenal so that's one thing I would say now if you don't leave
any other edges out like me so you just braid up everything you can't really see
any of your real hair then perfect go with any of the colors but if you're
somebody who does leave something out you're looking for a little bit more
than ability I would say go with feet ombre colors they do have good ombre
colors or just get a solid color that matches their hair color so I'd have to
say this is probably the lowest maintenance here that I have tried in
the last seven eight months and I'm so thankful for that when I say low
maintenance though I mean literally you guys ask me all the time but what did
you do specifically I can't make a video on what I did for this hair specifically
simply because it would be a one-minute video I'll be the shortest video ever
gonna be a waste of my time to record waste of your time to watch all I did
was Musa say or what so we run my fingers through it and detangle the
curls and it's usually a Friday Saturday night so while I'm watching TV or I'm
doing something monotonous I'm just really going through putting mousse
through and separating out the curls that's all you really need to do and you
only need to do that once a week when I think once a week don't do it twice you
ain't gonna do it on Monday Wednesday just do it what day of the week and it
will work phenomenally I did it four times throughout my entire day of
wearing of this year I did at that very first thing I did it right before I film
my first week sauce I did in my second week and I did it right before coming on
here fulfilling my third week your thoughts on this hair so what I'm doing
Brunning mousse through put mousse throughout you can either mousse a
section or just put mousse in and then just go through out on detangle that's
what I do when I'm extremely lazy it's just mousse the whole thing detangle and
it's super simple and the Heritage it just doesn't attach itself you don't
have a big glob of here it's preventative a lot of the times because
this hair honestly didn't have a tangle issue but if you want to be perfect if
you want to wear this hair and maximize the time that you can wear this hair
just be proactive and detangle if you see some issues coming up and maybe you
do need to detangle a little bit more than I did but again I did not have an
issue with tangles with this here because I was proactive with detangling
my hair and I really needed a little maintenance hair especially with what
I've had coming up in these last couple weeks for the last couple weeks I've
been traveling a lot for work with college recruiting college recruiting
season is here so you're on campus and all that representing the company and
all that and I needed to hear that I'm overnight at hotels I just really can't
wake up in the morning we usually have to wake up at like 7 o'clock in the
morning to be on campus at like 8 a.m. for career fair so I don't have time in
the morning just to sit there and just come up with a style I really just need
to wake up take my hair out so what I do at night is I pineapple too here so just
pull it to the top like so I have my bun and I'll put my bonnet on in the morning
all I do is take it out of the pineapple style as needed and then I just edge put
my edges down and you really are good to go and also in the last week this
previous week we had hurricane Florence and I want to take a moment to step out
and say thank you guys so much for your outcry supporting hurricane Florence you
guys came through in the comments section of my video in the comments of
my IG and my snapchat DM is in my Instagram DMS even some of the guns
emailed me which is an amazing amazing so thank you guys so much for your
support doing that I never realized how great my friends are into all the
situations like this it hit the Caroline I really never get an opportunity to
thank you guys as much as I need to but you guys are an amazing group of people
out there I have amazing group of supporters out there and you guys were
just so much so vigilant and so much so checking on me I got ups almost daily
how is everything going so thank you guys for your support throughout that
but I say that today the last week has been a very brain meet in North Carolina
very rainy Florence came through and it was like okay we're here to stay rain
rains here and all that so when when it's a hurricane light rains the wind is
hitting you and the water is hitting you the umbrella ain't
doing anything so a lot of times I would just walk outside say forget it I'm
probably because somehow rain came above the Unreal Engine attack and I didn't
feel any kind of way with this crochet here I didn't feel like okay this here
is gonna look a hot mess afterwards I will walk out proudly and drinking rain
in this year and not feel any type of way and I say that to say this here is
very water friendly in my opinion I think you can go to the beach I think
you can go vacation I don't need to pacifically dip this here in water to
know that this here is gonna react well because I really truly got drenched and
so much rain over the past couple weeks that it isn't even funny and I felt in
no ways about especially me having a dog too
my dog just kept wanting to wander off every time it seems like during the peak
of rain is when she had to use the bathroom and I'm just outside just like
hotels in here get Dotel and I didn't feel any type of way cuz this air which
is continuously get drenched but I knew this here would stand out so this air
works extremely well above sea and under this sea and also I believe is what
activewear friendly I think if you wear it short kind of short and just kind of
pull it back when you work out you should be perfectly fine I would just
think you're probably gonna have to detangle it a little bit more and I
think that because people work out a lot they probably you want to wash their
hair a lot more than then the typical person would be this hair has a very
much so natural luster to it but I can see it may be losing its luster after
maybe of repeated washes so up until like three or four washes you may see a
little bit less luster to this hair and I would say only to that bring out your
braid sheet and spray to restore some of that luster or your Hawaiian silky I
could see that restoring some Western I talked about the luster of it it's not
shiny I don't even think I'm trying to think of how I felt about this year
their very first day I don't think I had an issue with shininess of this year
like I did with the free choice water way if you're trying to compare the free
transporter wave here or this year get this hair because the shininess of the
water wave goes away after a while a wearing but you have to wear that hair
out for a while you don't have to wear this hair out and it's not shiny it's
not a hair that you're like oh is that plastic okay Barbie doll hair not
feeling it especially if you separate it out separate the hair out as you're
installing like I showed you guys in my first day thought separate it out and
definitely doesn't have that shiny effect
so overall the thoughts do I recommend this hair I think after everything I
said it should be pretty clear that I overall recommend this hair very
inexpensive I looked on so online right before filming this this
here is anywhere between 3.97 cents in about five dollars and twenty-nine cents
is the most expensive I've seen this hair so you can get it they're very
affordable you don't need a lot of pack so this year I didn't use a lot of pecks
of this here I don't believe you would need any more than five six if you're
being very you know full boom boom boom but five packs is probably what you need
with this hair I think this hair also comes in a
variety of color so you have color options out there you're not very
eliminating your options now you guys let me know have you tried this hair let
me know your thoughts down below are you thinking of trying this hair have I
convinced you to try this here or there any other movie trust hairs out there
that you wouldn't want me to try so far I'm too two-and-oh on my love for Lulu
trust I tried deep boy if I really did like that hair this hair is definitely
better than the deep wave to me it's a different curls so they're not even in
the same curl family but overall I enjoyed my experience more with us here
but I do want to try the wet curly I do want to try the beach curl there's so
many curls that I want to try from Lulu trust but if there's anything
specifically you guys let me know down below in the comment section make sure
you're following me on instagram at lila 189 make sure you're subscribe to this
channel so you don't miss any of my upcoming content make sure you give this
video a big thumbs up and I will see you in my next video thank you so much for
watching
-------------------------------------------
Suspiria: Movie Review - Duration: 1:04.
Is the new Suspiria an over-the-top gorefest?
"There's more in that building than what you can see, doctor."
You better believe it.
This remake of the 1977 horror classic follows some truly bizarre events in a Berlin dance studio.
"She can see me."
Talk about off-the-charts violence.
This movie serves up extreme blood and gore, with shootings, bombings, stabbing,
multiple deaths, and brutal insanity.
The nightmarish imagery is striking and unsettling, to say the least.
Then there's the nudity.
We're talking multiple scenes of male and female full-frontal,
plus crude language including F-bombs, the C-word, and more.
Common Sense says Suspiria is OK for teens 17 and up.
For more age-appropriate media picks, visit us at commonsense.org.
-------------------------------------------
3D Model of CHEVROLET C10 SILVERADO 1981 2WD Review - Duration: 3:41.
-------------------------------------------
| Swatch + Review | Bộ Son Kem Lì Cực Hot Mùa Thu Đông - Chou Chou Professional Matt Lip Color - Duration: 7:30.
-------------------------------------------
YouTube Traffic Masters Course Review - How to Start Your Own YouTube Channel and Start Making Money - Duration: 8:47.
And salam alayka wa rahmatullah wa barakato how are you everybody did you say they are once again peace and blessings be upon you all?
Straight to the topic. You can see it. It's gonna be youtube youtube youtube
You know
this is like if you're into online marketing if you're into like
Affiliate marketing or if you're into anything to do with online business
YouTube is the place to be I mean, this is the best way of
What do you say this is I mean there are lots, you know Facebook. There's Google
I mean, this is actually part of Google only YouTube, but you know
Like I mean to say the adverts but out of all
This is my favorite and if you are into a fleet or if you are into online marketing online
Business you need to have a presence with YouTube. So
Many have this problem of you know, facing the camera and talking and they think you know
There are problems like, you know how to handle with the YouTube but you know
This is something you need to come across like, you know, you need to overcome all these
You know small
Issues and stuff but but you know, this is like the mainstream, you know
YouTube is like the most searched platform like, you know in terms of whenever if somebody asked me like for a free traffic
This is what I suggest, you know, they're also free traffic like, you know
They they like me to say there is also a paid traffic like you can pay
Okay. Now you can have YouTube ads as well paid ads, but you know, even if we can
Get your video ranked up on your first page like through basic, you know basic strategies
You should be good enough, you know
Even if the free strategy should be good enough to reach lots of lots of people
So straight to the topic if you see I've just wanted to do a review of phone of the course
Which I took like I mean almost like six months ago
This is the course which made me I know concentrate more on YouTube
You know as you can see there tapia, the the course is called adversity
YouTube masters cause YouTube ads cause actually
This is Shawn who actually I'll show you
I have almost taken almost all his courses you can see this is all the courses in part of our city I have
taken almost everything
This is I started actually we can see this my online internet marketing journey started with this one Clickbank masters Academy
So this is where I've made like
Good amount of money when I started with and this is the YouTube ads which I'm gonna talk about today
This is really a very good one. I mean, I'll just show you inside the course itself so that you know
You can see this in this YouTube ad schools. You can see you can see first and foremost
He talks about the strategy how to budget. You know, what kind of
Like, you know out of here all your campaigns. He talks about the ways to do both like paid as well as
free kind of how to rank your videos so that's what he talks about if you see and then the second part is a
Keyword research, you know?
like there are two things either like either paid paid or as well as free both has this option of you know,
Placements you can have cool words as a keywords or you can target each videos, you know
which videos you want to talk it so that he talks about here and there's
There are few rules. You need to follow about, you know in advertising in YouTube which which is very important
You know, I'm like you need to follow those rules so that if your ads or your videos doesn't get banned
so that's he talks about in the video 3 and there we see this is I'll just show you this is such a
Important things I just yeah, I just pause the video. I don't want to reveal a little too much
This is a paid course
If you see this, you know this this wall, you know
Lots of people may have you do youtubes and stuff but this makes what but you know
You spend a lot of time making a video. You need to know the strategy how to make it useful see this
This is what he explains
This is something I didn't knew I was not doing before when I was I know I was just doing a video
I was just putting a link and I didn't really think of
Know this this what it is, you know, you have a video you put a landing page what the sadducees you know?
This is what it is. And this is something I was not doing before who I took this course
Basically what the idea behind it is?
Directing directing them to another planning page from there directing to another video pre-sale video
Not inside the YouTube. It's on a landing page from there
Basically the idea is to collect the email collect the email and then follow up with the daily email follow-up
this itself is a such a strategy which which is gonna
Make a big difference. You need to do YouTube advertising or like off
This is a big difference is gonna make on your strategy itself
That's the that's on the YouTube ad sales funnels. And this is what the the meat-and-potato this comes basically about
He just gonna show you
in this three-part series a part 1 part 2 part 3
Is just gonna show you from the scratch how to set up my YouTube channel and out to rank it
This is what it is
You know series in this step one media is gonna do that how to set it up on your new YouTube channel
Second one is gonna show you the complete ads YouTube ads training
That's very that's what I am into now most of the time I do YouTube ads and the third one
There are few tips and tricks you're gonna learn which is like which makes you apart from the other youtubers, you know, that's very important
That one and then he's gonna do a live YouTube as well
he has done a recorded one like I mean, he's also gonna show you like a
Like a live, how do you set up a new ad campaign?
On this video 8 and then the last one is just gonna show you how to add
Basically, you want to add another videos to X if you're already running a campaign
Even if you want to add one more videos to it, it's just gonna explain in this video 9
if you see this entire course, I'm telling you when I bought this course it was like
Hundred dollars like $97 you won't believe
The reason why you won't believe what is the cost of this course?
I'm just gonna leave it and I'm just not going to reveal you is just giving like
Giving it away for free almost like a free like, you know a cup of coffee that surprise you're gonna pay for this course
It's really worth
this is the course which made me you know, do a lot of more, you know, increase my youtube presence and do a lot of
YouTube
videos for you know after doing after watching this taking this course, so actually this is such a
That the prize which is giving it away now. It's just like less than our
Prices you might be paying it for a coffee. Yeah. I know everyday that's what the price of this it is
It's five dollars. I distill you this just five dollars easy those ninety seven dollars
Which I bought but since I have like complete access to his entire
I'm part of his Platinum masterclass. I get access to all these causes
So but when I started with diversity
This is where I started this this makes this made a big difference in my youtube career
So I'm just going to leave a link below this is worth
The entire know if you see it's really completely worth four five dollars. You just go no like it's a bargain
I'm telling you if you are into new to YouTube or if you want to you know upgrade your YouTube
Strategies this is gonna help you a lot. I'll just leave a link below. Try it out. It's no compulsion
There's also money-back guarantee. You can try it and if you
Really got any value out of it. Please share it. You know, I'm always sharing only those causes
Which really made me money
Without that I will never recommend any cost that's always I've been like that, you know, I recommend like two to three courses
it's like I think our focuses I think to my knowledge one is like for SEO one I found the best for
Google Adwords and one this Clickbank which I showed you the click bang your it is the Clickbank
This masters Academy and these YouTube ads. These are my like, you know top for like favorite ones online which
Will give you results that's what is it for which can get you results. That's what is important
I never recommend any cause which doesn't give results. So that's very important. I just don't know makes your time
I just gonna leave a link below. Try it out. This is worth a lot for $5.00. You know, it's really worth
Thanks a lot guys. Take care. If you liked it, please share comment anything to do with?
YouTube funnels affiliate marketing leave a comment below. I'll just answer to you. Okay. Take care, man. Thanks a lot. Bye
-------------------------------------------
Swiffer Duster 360 Product Review - Do They Work? - Duration: 13:48.
Is the Swiffer Duster safe to use and does it work?
That's a great question and we're going to talk about that today.
Hi, there.
I'm Angela Brown and this Ask a House Cleaner.
This is the show where you get to ask a house cleaning question
and I get to help you find an answer.
Now today we're going to do a product review on the Swiffer Duster 360.
360 means it goes 360 view all the way around this handle.
Now they also sell a 180 view.
You can see that on half of it, there's nothing.
And for the price, I've noticed that the price is about the same.
So between you and me, if I have a choice, and I'm a professional cleaner, so I want
to get the biggest bang for my buck.
But as a professional house cleaner, I'm going to go with the 360.
The 360 lets me do more, and then when it gets dirty on one side, I can turn it over,
and use the other side.
So, for me, I prefer the 360.
Let's talk a little bit about the 360.
It's designed by the Procter & Gamble Company, who also makes Febreze.
So if you love the smell of Febreze,
they make the Swiffer Duster heads, these are disposable heads.
They make these in unscented and Febreze scented duster heads. Yay!
So if dusting has been something that you've been holding off on because you don't like
doing it, and you love the smell of Febreze, this might be an incentive now for you to
pick up dusting.
Okay, so it is a plastic head.
It's about 13 inches in length.
And it comes apart, just like this.
Then when you get ready to put it back together, it just snaps in place.
And there are two-little, sleeves that this just slides right into, and slides on, and
becomes your duster.
Now I like this duster because it's small enough that it fits in my back pocket.
So as a professional house cleaner, I always have it with me,
and it's always just within reach.
So I can be cleaning the house, doing something, and then I see some dust.
Grab it, take it out, dust it, put it back, and I'm good to go.
So I love having it with me at all times.
Now the secret to making this work, is you got to have a button in your back pocket,
so that it holds the duster from falling out while you're using it.
Okay, so the story, real quick, of Procter & Gamble, and how this came to be.
Back in 1999, Procter & Gamble decided that they already had a product line of cleaning
chemicals, and supplies, and mops, and all these things.
But the market was kind of stagnant, and so they decided they were going to renovate the
cleaning line, and find more efficient, easy-to-clean ways for people.
And so what they did, is they spent five years and a bunch of money in research and development.
And they went out and they made a whole bunch of appointments with people.
And they went and they watched the way that consumers clean.
And they came up with a whole new line of products.
They did not invent them all, but they took products that were on the market, existing
products some other manufacturers had already created, and they reconnoitered them to the
products that we're so fond of today.
Okay, so this is one of those products.
And when I first heard about this, it was several years ago.
Another house cleaner called me and said, "You're going to love the new Swiffer Duster."
And I did not love it.
I was accustomed to the old one, the feather dusters, where you would use them, and then
you would shake them out when you're done.
And this one does not shake.
Okay, so it's designed with all these trap and hold elements to it, so when you shake
it like you do a regular duster, nothing comes out.
And so that's kind of awesome because it traps everything inside, which allows you to use
it for an entire house, while you're cleaning it.
Now the marketing method that they use, in the marketing arena,
we call it the razor-and-blades method.
Where, in the olden days, they would sell you a razor, very inexpensive.
And then the blades were very expensive.
And so in order to keep refilling the blades, you got to pay the big money to get the blades.
This is the same concept.
You can buy a starter pack, this is a starter pack,
and it came with one of these handles in it.
And so, you get that for the price of, I think this had three, and one handle.
Then when the replaceable heads are gone, then you have to buy more.
Now these are not cheap.
You can buy them in bulk, so the boxes are bigger, and you get more for your money.
But it averages out to be about a dollar per head, okay.
So these are not cheap.
Now, as a professional house cleaner, we are inside peoples' houses, and we charge them
for the cleaning supplies.
So my suggestion is, build in the cost of one of these per house because you will use
one per house, and when you're done, they look nasty, okay.
They've got lots of dust on them.
See if I can get up close here, you can see how nasty that looks.
It's got hair, and cobwebs, and dust, and junk on it.
And this is typical of any house.
You're going to get this much dust off any house.
But when you're done, you don't want to take this into another customer's house.
And so, when you take off your gloves at the end of your cleaning, you can just peel this
off, like this.
And this goes right in the trash.
Now I have the SDS Sheet here in front of me, and we'll go over the pros and cons of
the unit, itself, and is it safe, is it biodegradable, and all those things.
We'll talk about that right now.
Now it is Proctor & Gamble.
We talked about that already, and they are a worldwide company.
These Swiffer Dusters are available worldwide.
So if you're excited about them, I know I am, too, you can get them just about anywhere.
All right, the next part of this is what are the hazards, and they have to list this, by
law, like we talked about before from the Globally Harmonized System.
Proctor & Gamble even went so far to go with OSHA, which is the Occupational Safety Health
and Administration, and then also the Canada version of OSHA, which is the Workplace Hazardous
Materials Information System.
So they've cleared their products on all fronts because it is a worldwide product.
So that's good to know.
So the hazard that they have listed from the
Globally Harmonized System is ingestion issues.
So you cannot eat this, not for pets, not for kids.
And if you do eat it by any example, then you need to go to the doctor because that's
not cool.
Another thing, the fire hazard.
If it catches fire, and it will catch fire, because like it's fluffy.
If you light a match to it, it will catch fire.
But water or a regular household fire extinguisher will put it out.
So that's good to know.
Okay, so as far as it being biodegradable, it is not biodegradable.
It is not, but it has been cleared to go in landfills and processed in your regular garbage.
So as far as throwing it out, you're allowed to throw it out in your regular trash.
That's what it's designed to do.
All right, there are no other special warnings specifications.
When you talk about the description of it, it comes in yellow, and it comes in blue.
So this is exactly what the boxes look like, it matches the picture on the box.
So we're good to go.
Okay, it is a stable product.
It says store in a cool, dry place.
It doesn't have any reactions to anything that we know of.
No target organs are reported.
So if you use it, it's not going to affect your heart, or your lungs, or your liver,
or any of that stuff.
So that's good.
All right, the last thing, is it safe to travel?
Well, it's not regulated by land, air, or sea.
So if you want to ship these anywhere in the country, that's fine.
And, if you want to carry them, and sneak them in a carryon bag on an airplane, it's
safe to do that, as well.
So just so you know.
All right, then the last part is the regulatory information.
And the regulatory information, it says, all ingredients are CEPA Approved for import by
Canada and Proctor & Gamble.
So the product has been classified in accordance with the Hazardous Criteria for the Canadian
Controlled Products Regulation, which is CPR.
And the MSDS, which is the Material and Safety Data Sheets.
All right, now I want to show you a couple of different ways that we use the Swiffer
Duster.
I use it on all sorts of things.
For example, silk plants.
If you're going to use a Swiffer Duster on silk plants, what you want to do is, you want
to pull the stem of the silk plant out, and you want to start at the base of the silk
plant, and you want to brush towards yourself, so that you're brushing the dust in the direction
or the grain of the plant.
It's also great for real plants that have deposits on them, either from themselves,
or from dust, or debris, or whatever.
So you can use them on real and silk plants.
Another thing we use the Swiffer Duster on are blinds.
So if you have blinds that are really icky from a customer's house, the first time you
clean their blinds, you may want to clean them with soap and water, and then after that,
just use your Swiffer Duster.
Because the pattern of using them on the blinds is very easy to do, and it will keep your
blinds dust-free.
And again, because it traps the stuff that's there, if there are any cobwebs inside the
windows, it will trap that.
Then you can just brush the window down, and the window sill, and you're done.
Then moving on through the rest of the house, there are other things you can use your Swiffer
Duster for.
For example, let's say that you have something fine, like glasses on a baker's rack.
When you use this on the glasses on the baker's rack, you just want to be very careful that
you hold the glasses in place, so that you don't knock them off as you're dusting.
But you can dust right between those, and the little filters of the microfiber cloth
here, it goes between the glasses.
And so it fits into little nooks and crannies that normally, you would not be able to reach
with just a regular cloth.
Another thing that we use the Swiffer Duster on are stairwells.
This is excellent for stairwells, to reach the banister railings that would be very hard
to get between, especially if they have little decorations and designs on them, like those
that you find on wrought iron stairs.
And then as you come down the stairs, there are ledges on the side of the stairs that
you want to make sure that you dust, as well.
And while you're there on the stairs, especially if it's a hardwood floor, hardwood stairs,
you can actually dust the stairs themselves and make sure you get this rim underneath
the stair, where cobwebs like to hide.
Then you sweep all your dust down to the bottom of the stairs.
And guess what?
There's nothing there because it trapped it inside your Swiffer Duster.
So if you're going to do a stairway, what I do recommend is that you use this and do
this as one of the very last things you do cleaning a customer's house.
Because at the end of the stairs, you're going to want to throw the head away because it
will be full of stuff and it will be icky.
All right, another thing that we like to use this on, are lights.
We like to use it for recessed lighting to clear out cobwebs.
Now the secret of using it with lights, any light, is to have the light turned off.
Because if you go at this with the light turned on and the light is hot, this can melt, or
it can stick to the light bulb.
So you don't want that to happen.
You want to make sure that the light is turned off and cool before you go around recessed
lights, or inside bathroom lights, or inside lamps, or on the outside of lampshades.
You want to make sure that your lamps are cool.
Also, if you touch a light that's hot, there's a chance if you touch the light bulb, itself,
that the light bulb could break.
So you want to be very careful about that.
But it's great for all kinds of flat surfaces.
It's great for things like TV screens, so that you can get all that electrostatic dust
off there.
It's great for entertainment centers.
It's great for wood pieces of furniture.
And then as you go down the sides of the wood furniture, you capture all the dust that's
resting on the side, and in all the ledges.
And then underneath the furniture, where cobwebs also like to hide.
So it's a great tool because it's so flexible.
It flattens out so that it slides under skinny places, and into skinny places, and between
skinny places.
And then again, because it's so convenient, it's always on your person.
Now there's another thing that I should mention.
Swiffer Duster has an extender pole.
So if there are places that you want to reach that are up high and you don't have a stepladder,
you can buy the extender version.
We'll talk about that another time.
But if you don't have the extender pole, we can just use a small stepladder, and even
get things like ceiling fans, and the tops of refrigerators, and you can also get other
things that are high, like shelves or even cabinets.
So there are so many different things that you can do with the Swiffer Duster.
Now one of my favorite uses for the Swiffer Duster, is I keep it in the pocket of my car.
Right as you open the door, I keep it right there between the seat and the door, so that
if I'm sitting there in traffic, and I have a couple minutes, and I'm not going anywhere,
I can sit there and I can dust the front of my car with all those little nooks, and crannies,
and crevices, and I can get out any food, dust, debris, anything that may have gotten
in my car when I open the door.
So another great use for the Swiffer Duster.
Does the Swiffer Duster do what it's designed to do?
Yes, it does.
And it's become one of my very favorite cleaning tools because it is disposable.
And I'm a big fan of tossing it out when you're done with it.
And I do bill the customers for these.
Now the ones I use in my personal house, I bill myself, and it just comes out of my grocery
budget.
But, like I say, I love the opportunity of throwing it away when I'm done.
So that I'm not recycling the dirt, the dust, and all that stuff.
So I love this and I'm going to give this the Savvy Cleaner Seal of Approval.
All righty, and that's a little bit about Swiffer Dusters.
If you haven't given them a try, maybe it's time you do.
And I want to hear all about your experiences.
Leave me notes below and let me know whether you're a 180 or a 360 user.
I'm dying to hear your experience.
All right.
That's it for today.
Until we meet again,
leave the world a cleaner place than when you found it.
-------------------------------------------
🍀WEIGHTED IDEA Weighted Blanket (Children's Sensory Blanket) Review 👈 - Duration: 4:22.
Welcome back to the channel. Today I'm going to be showing you a weighted blanket
from Weighted Idea. This one is for children. There's been a lot of buzz
about weighted blankets promoting sleep and reducing anxiety
This is the Weighted Idea sensory blanket. This blanket is seven pounds but
they are available in different weights as well for adults and children and the
sources will recommend the blanket is from ten to fifteen percent of body
weight to calculate how heavy you want the blanket,. They're available in a variety
of colors this one as you can see is a navy blue but in some lights it's so
dark it almost looks black. This blanket measures 41 by 60 but there
are available in a range of sizes but this is a pretty good size...because it's me me!
because it's for you. The exterior cloth of the blanket is 100% cotton and it is filled
with hypoallergenic sand-sized poly pellets to give it weight. What? You can
see it's 100% cotton non-toxic poly pellets. Let me see - oh yeah!
So this is a dry clean only type of blanket. It feels kind of soft. The product insert does state that
is dry clean but you can hand wash it as well - I said it's soft, it's soft.
it is it would be a good idea to
get a duvet cover to fit over the blanket and that way it would allow it
to keep clean. I didn't realize at first when I looked at the Amazon listing that
this required a duvet cover but I went back and looked and saw that they are
sold separately but you couldn't use any duvet cover that fits it doesn't have to
be for the same company. There are individually stitch pockets
they keep the distribution of the weight uniform here
here well and there are tabs to connect to a duvet.
the corners here. These weighted blankets are designed to
simulate the feeling of being held or hugged. Hugged!
so this is the insert that comes with the Weighted Idea blanket showing how
it works who can benefit from it the precautions, care instructions for the
blanket and also the optional duvet cover you can get. There is research
showing that they can increase serotonin and melatonin levels and decrease
cortisol levels which improves mood and promotes sleep. They are used to reduce
or manage symptoms of autism PTSD ADHD sleep disorders and nervous system
disorders. So I'm going to show you how my son likes the blanket these weighted
blankets are obviously used for beds but could also be used for snuggling on
sofas or chairs. So how do you like it?
it feels soft. It does? Comfortable. mm-hmm is it relaxing yep Feeling sleepy?
yeah. It just makes me feel good and awesome. Well that's a look
at the Weighted Idea sensory blanket. Please check the description section
below for more information and links to our social media. Thanks for watching! Bye!
-------------------------------------------
New London Wine Bar Review with UTB!! - Duration: 9:13.
welcome to wine jam where our special guest michael has his own wine channel
underneath the bottle he comes all the way from Norway to do an exclusive
review we are checking out three different wine bars in London that has been
recommended by the decanter magazines
alright so st leonards an interesting experience I had a red
cabernet franc to put a long story short it was a bit flat on the nose a bit flat
of my palate didn't really listen to go you know because it came out of tank
containers I don't know if that made a big difference really did feel like a
wine had been open for like a day and so not great
yeah I had a Godello and you know from northern western Spain and I had it the
other day and I was digging it I wasn't loving it and I was feeling for it again
so nice why don't we had it on the wine list I was like my turn again
but it was a let down and was a watery sensation and very short no intensity so
very sad about that but I was the entry at that my wines the Last on we had which
was the Vigneri Tardis I might get that completely wrong I thought it was all
right I don't think it was too great I thought the texture was there it got
kind of some of the flavors but I thought it was too elegant and well I
think on the other hand I think was complex a lot of secondary aromas when
you first got in there not much happening in the nose but on the palate
for me it started doing stuff and I need a complexity I thought the place was
really lovely it's a lovely huge on a bar there it was
right in appealing to kind of walk in and have some way point appealing to sit
there and be like it obviously has a focus about wine I like the space of it
was huge not just around the bar itself any of you always like the oysters how
about yeah I kind of forgot how to eat oysters for me i just swollwed them down but yeah
the first couple of wines were a bit let down he loved the last one
you'll see we will see it later let's go to the next one so we're at Leroy's
right now this place is crowded it's popular we some people passing by and
already mentioned hey is this Leroy that's just a lot in here I ordered a glass of
well it's barely ended last but this is a Anglianico from Campania it's getting
colder weather is getting rainy welcome to London exactly right but funny enough
they have these warm feel a little bit more robust tannic fruity acidic you
know a glass with everything in it just for me to feel good about myself in it
London weather I happen to take a choice of Canaiuolo which is a red grape
variety which comes from Tuscany Italy this is the skin version this is
basically about leaving the skins just in contact with wine and it kind of
gives another flavor or texture to the wine
it really has in this case is candy sort of flavors in here a nice floral flavor
flavors coming across to other than the nose and it just keeps developing
there's a texture to this as well the acidty light body is light as well but
it's it just keeps evolving there's just other things that could come down so I
I'm seriously thinking this might be in my top 10 far as Leroy's lovely little bar yeah
a lovely little kind of restaurant area they're definitely taking elements from their
michelin star Elroy's from there it's it's good nice little wine list as well for
by the glass I agree nearly forgot we've had the owner a really lovely guy
they're not a collaboration with other restaurant serves to make this
particular wine which I spoke them out before beginning entity hefty I swear
every time I'm saying it it'll be down below
it's Fiano / manzilla it was a Malvasia yes malvasia
sorry it a malvasia lovely wine really yeah it was great to see him taken up by his wine
onto the next one for us, your clearly needing another top up, let do something about that
Alright so we have come all the way from hoxton station
to Laughing Heart in the rain
I tried a Gut Oggau an Austrian Wine which a blend of a blaufransch and zweighlt grapes
it interested me hav never had a blend of those two before,
i found more earthly notes
so the blackberries and black cherries there but doesn't linger around very
long you know I expected more the label was of a man face so must be really personable
it fell a bit flat in certain places
had a red wine from the wine region beaujoliais, i have covered alot of videos from this area
love this kind of wines it 100 per cent
it from a sub region called moulin a vent, this was not what i am comfortable with
of course I had that fruit but very unbalanced and not too happy about that one
it was different but it is what it is
I mean yeah a bit of a mixed bag obviously what he tasted and what i tasted
it upstairs so I think you both agree is really lovely cave kind of feeling there are little lights every where
very really intimate kind of feeling someplace you want to go with a little tiny group not a big
party people will place so the service was great
yeah and really made a personal service yes because you actually had a wine of
the list because he offered it as the last wine it a chance,
yeah which I thought was great
was great and then we thought that wine by the glass a bit short on the list
yeah he also offered me a tempranillo that was not on the list so i thought that was great to have something thats there already open as such
I would recommend it I think it's quite nice split between a wine
shop which we've got down here and the resturant upstairs which kind of reserves the wine from here
so that the Laughing Heart
Final Review of the 3 wine bars we have been to today..
For me Straight up Leroys Vino Recommend from us
it was it had the right vibe about it, even the owner was
really welcoming
why dont you try these wines out that he's actually producing it in Italy
i love you guys to try it so he gave us free sample to try it
the whole place had a personal feeling i mean, i thought what wines we had stood out from the other two places
red skin wine was in my top ten, it was everything i wanted at that moment
was everything I wanted at that moment Nicole was ready and they had a good
selection any other feeling exactly and I think you know the other place is cozy
a bit more like a party area but the first one yeah yeah I agree but uh the
wines just
just - yeah Leroy's it is
dude it was such a great time preparing these one person one Bend I'm here in
London and each other to set yeah all right okay okay so they tell by I this
is a great exclusive you guys
guys thanks for watching our video please like down below if you like our
videos and we will be having more content which you can click here and
here are the videos that we've done already you can also subscribe just here
by clicking here exactly so we hope you see more of our wine content because we
love it
-------------------------------------------
Snapnator Pro USB-C Magsafe Replacement Review - Duration: 6:19.
okay guys as I promised gonna do a review of another option for powering
your MacBook Pro with that magnetic adapter since Apple not happy about them
getting rid of the Magsafe but they did and we're still dealing with that but you
know last year I got the with 2017 meta Pro I went with a VIN pop bolt and that
was the first one on the market that did 87 watts charging powered for the
MacBook Pro 15 inch models and we got that and it worked well for me I bought
two of them when I bought it because that's my main work tool and so I need
to have power always and one of them died and even once I bought two they
worked well for me a lot of people had bad review saying that the cables failed
very quickly mine worked for about four or five months and then both of them
died within a month of each other so not a very good option the quality controls
not very good apparently on the VIN pop bolts and I think that's why they're
doing the bolt to now and basically instead of going with a bolt to because
of their quality control I will another option called the snap
Nader Pro so we're gonna take a look at that and review that I still don't think
it's where the MagSafe is I haven't seen anything that really you know compares
with a MagSafe adapter the MagSafe adapter seemed to be the perfect design
the perfect engineering it was a good magnet solid magnet it didn't fall out
if your hang in there well we'll take you to the snap Nader Pro because it has
been working for a while now we'll take a look at it I'll show you it's like
it's got some faults as well and that was good smack sake Pro but it looks
like apples not bringing it back they're gonna stick with this USBC adapter for
all their power and so we got to deal with it so if you want a magnetic
adapter which is what I want because I'm in an environment where I'm constantly
changing as an IT consultant my laptop is all over the place and for a laptop
they cost $3500 I do not want somebody tripping on the cord and ripping my
laptop onto the floor and busting the screen so I I really like the magnet
adapter so we'll take a look at snap Nader Pro alright
snap Nader Pro when I ordered it took a couple weeks to come was coming from
China showed up in a yellow wrapper yellow envelope rather and it's kind of
beat-up unfortunately it all it is is this little piece here this is all it is
the idea is you're going to use the original cable
came with Apple and I really think that's where VIN pop messed up by trying
to use their own cable I just don't think their quality control on the
manufacturer most cables and here's good but the idea is I've got this USB see
magnetic adapter this will attach to your Apple cable the Apple power cable
basically will have this magnetic attachment there and go to it so here's
a 20-17 MacBook Pro and we'll take a look here basically what you would do is
you would take your power adapter or this piece of it and you put it in your
USB C port so USB C on one side there's the magnetic adapter on the other we're
gonna put it in our original cable that came with Apple you've got a small LED
indicator and you put it on here and it just hooks on the magnet you can see it
light up you heard it light up and you also see
our lightning bolt up here that it is getting power so a couple things about
this is what I found and again this is a 2017 model but what I found is that you
know you only have the light on the one side and it's very kind of iffy to see
that so it's just a small light but that's okay the magnet seems to be much
stronger than the VIN the VIN pop bulk and most of time that doesn't come out
when it's in a good but the man it seems to be a good bit stronger than the VIN
puck bolt but being that it sticks out so far the way to this I still have the
similar problem if that if you're sitting holding a laptop in your lap
just the weight of the cable sometimes is enough if there's to take to unhook
it and you can see the light going off and try and get back in there now so you
know it works in the works fine if you're sitting on the table and your
cameras gonna be on the table is kind of power non-stop but if you're moving your
laptop around sitting in your lap moving things it's gonna just the way that is
gonna come undone and it's gonna lose this connection so you know does it work
will solve the problem yes is it the same kind of cloth - Mac safe is no is
it better than Ben Puck so far yes because it has lasted now having said
that there's a 20-17 MacBook Pro I also have a 20-18 MacBook Pro and the issue
I'm gonna have here is when I take this out and put this in
here this does not really go in the USBC port none of these on the 2018 model and
you can see if I push it real I'm using a lot of strength to push this in okay I
let it go it comes out just enough so for whatever reason this snap Nader Pro
works in the 2017 mile it does not work in the 2018 model I don't know if
they've made smaller ports slightly smaller 2018 model but all my other
adapters all other USBC adapters fit both the 2017 and 2018 model but this
snap Nader Pro does not work in the 2018 model I can make it work by pushing
really hard but I'm telling you what I'm using all the force I had to shove it in
there far enough to hold that connection at the moment oh it's holding right now
but I can guarantee it's not gonna hold very loud just one touch and it's gone
okay so it doesn't appear to work for the 2018 model so just want to throw
that out there I'm still looking for a good MagSafe replacement apples not
going to do it but I but I kind of have come to the conclusion that what will
make a good connector one to one something wider like this that's more
like some of the MagSafe would be good but I really think what needs to happen
is you need the end of a cable that basically where the cable would come in
hook on like this I think that would prevent the weightiness from sticking
out so far and just weighing down and making it come disconnected but that's
what I think take the review for what it's worth it's
working but I'm not happy with it 2017 it works great but it's still not
like the good old MagSafe cable but that's what it is
-------------------------------------------
Tree Pro Tree Tubes Review - Duration: 8:22.
so good morning everybody you're having a great day today just out here in the
ducts it's nice and chilly 30 degrees when I came out here and changed the
duct water this morning as you can see it's all frozen in a recent video that I
did about planting trees a lot of you had questions about what the deal is
with all of these quote unquote PVC pipes well they're not actually PVC
pipes they are tree tubes when you have baby trees one of the biggest risks you
have to deal with in the early years is contending with animals specifically
deer and rodents far as the deer go they will browse down and they will eat your
plants apart and they will just brutalize them they just love to eat
that stuff especially in the winter they lead all the buds so that the tree can't
grow that next year and they do a pretty nasty job they will also rub against
kind of intermediate aged trees and that also can really significantly damage
them it can rip up their bark it can cause a lot of problems the other
problem you'll have are rodents so specifically voles but also mice to a
certain extent love to you tunnel in and around the trees especially eat at the
base of the the trunk of a baby tree and eat around the bark
do something known as girding when they do that they can actually kill and dry
out a tree so that is another reason why you'd want these tree tubes so I put the
tree tubes on our more high-value trees so for example so if you look at these
black locust trees right they've got some grisly thorns so not all that
worried about a deer or something coming in
eating on those but as far as the chestnuts ago I feel like they are a
much more delicate tree and they're actually much more important to our
long-term plans so to do that I protect them with these tree tubes I opted for
the 72 inch tubes they're actually just a little bit taller than me actually a
lot of bit taller than me I'm a short guy the idea is that the tree grows
undisturbed in the tube for the first couple of years it starts to pop out of
the top and it's at a height that is much much harder for the deer to browse
and graze on you can actually see in this mulberry tree it's actually just
started to pop up over the tube I'm over the course of this year that was about
18 inches tall when I planted it a year ago and now it's already popping up over
the top of the tube I expect a lot more of these trees to do that next year
I only had a handful that did that this year I ordered tree tubes from a company
called Tree Pro it's specifically their Miracle Tube model I'll leave a link to
it if you want to find them for yourself I bought a whole bunch of them in bulk
so I got a pretty good discount and I keep them stash over in our barn see
look this is my secret stash it was financially advantageous for me to buy
more than I needed and stash them here in the barn for future use keeping guard
for mice, Pablo good thanks buddy I am NOT doing this as a commercial for them
they have not paid me they have not given me anything free so in full
disclosure I am just a guy trying to grow trees trying to teach other guys
and gals about how to grow trees and I found them to be a very helpful product
so these things are pretty well made they're just a solid piece of some sort
of plastic they are translucent so they actually let light in according to the
manufacturer they let in about 95% of the sunlight so they're not going to
create issues for you as far as light blocking goes you'll notice here and
it's got little holes to those holes are allowing them to vent because the other
thing that these tree tubes do is they create what's known as a
greenhouse effect they trap heat in it's really nice especially at this time of
year because I have a theory that it's extended the growing season maybe a
couple of weeks on the front end and a couple weeks on the back end as I try to
protect against Frost's here on our farm so especially here in northern Vermont
having that a little extra growing time is really useful they're very easy to
install all you have to do is you use like a post driver to put in the the
garden stake you can buy the garden sticks from the manufacturer or you can
just find your own they come already pre-installed with these zip ties you
know the zip ties are actually adjustable too so you can change the
size to make it easy to pull them off or you can tighten it this is actually a
two year old chestnut seedling we put it in last year right around this time it
was about this tall it's now growing up to here I'd actually hoped that by the
end of next year it's probably up to the about the height of the garden stick you
always want to be careful when you put the tube back on make sure you're not
pinching any branches I also find it's pretty important to push really hard to
make sure that they're firmly down in the ground in here the the tight
placement to the ground makes them much less attractive to voles and other
rodents the tube stay up pretty good this whole hill gets pretty pretty windy
especially in the winter and there were only a couple times that we had to put
tree tubes back up after a bad windstorm or a blizzard so it's a pretty low
maintenance there is one downside though that I discovered the other day while I
was actually checking on trees and replanting some trees so one of the
things I've noticed is especially in the spring and summer birds love to like sit
on the top of this and nest you can see like this whole tube is covered in bird
crap and I don't particularly care about that part of it but I have made a couple
of discoveries of what can happen with these tubes with birds one of the things
I noticed was this getting closer here see this feathers it is a rotten dead
bird carcass right here by my count I found seven dead birds trapped in these
tree tubes and even a couple of weeks ago I was actually walking through here
checking on some stuff and I heard a bird struggling to get out kind of
jumping up and down what I think happens is these small birds they're just like
little small songbirds they get they jump down to the bottom of the tube to
try to find food or whatever and they end up getting stuck because they don't
have enough space to flap their wings enough to fly out and so they get
trapped at the bottom of the tube so I guess the upside though would be that
this dead bird is now going to be a fertilizer for this little tree seedling
a little chestnut so uh guess the circle of life right so
it's not a deal breaker for me I mean I feel like the overall net benefit that
the trees are gonna do for the land outweighs the cost of a few birds but it
is something to be aware of and it is something to watch out for if you guys
want to learn more about how we built our 600 tree permaculture orchard with
about 6,000 feet of swales and berms be sure to watch this video over here or
you can learn more about our farm by watching this also feel free to hit that
subscribe button thanks a lot guys I'll see you in the next video
Không có nhận xét nào:
Đăng nhận xét